Authentication
After installation, Coroot will prompt you to set a password for the admin user:
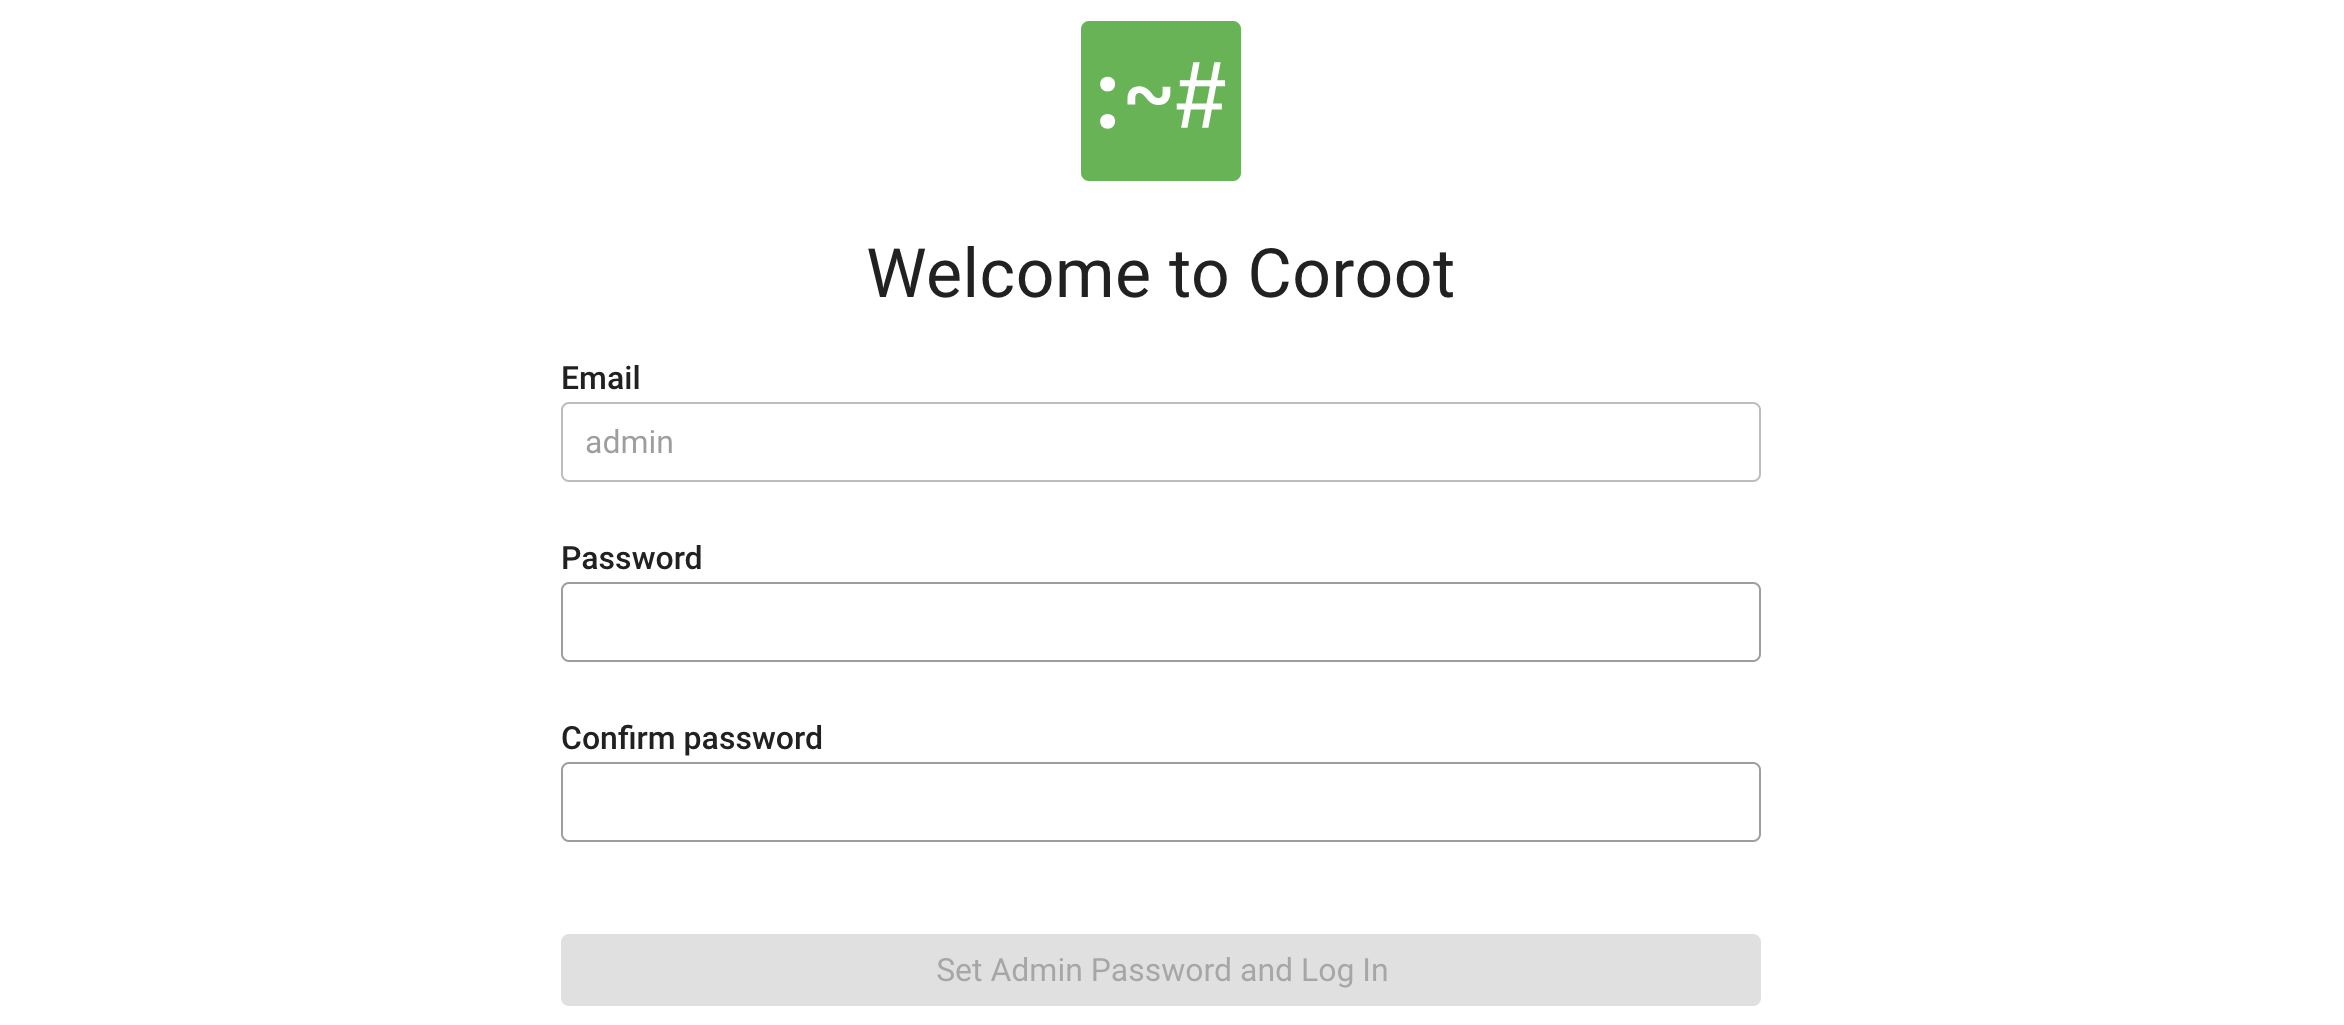
To prevent someone else from setting the admin password before you, you can specify the initial password using the
--auth-bootstrap-admin-password CLI argument or the AUTH_BOOTSTRAP_ADMIN_PASSWORD environment variable.
This initial password can be changed later through the UI.
Anonymous mode
To disable authentication, use the --auth-anonymous-role CLI argument or the AUTH_ANONYMOUS_ROLE environment variable,
setting it to one of the following roles: Admin, Editor, or Viewer.
Reset admin password
To reset admin password, use the following command:
$ coroot set-admin-password
Enter new password:
Confirm new password:
Admin password set successfully.
Manage users
To manage Coroot users, go to the Project Settings, click on Organization:

To add a new user, click "Add user", fill out the form, and select a role.
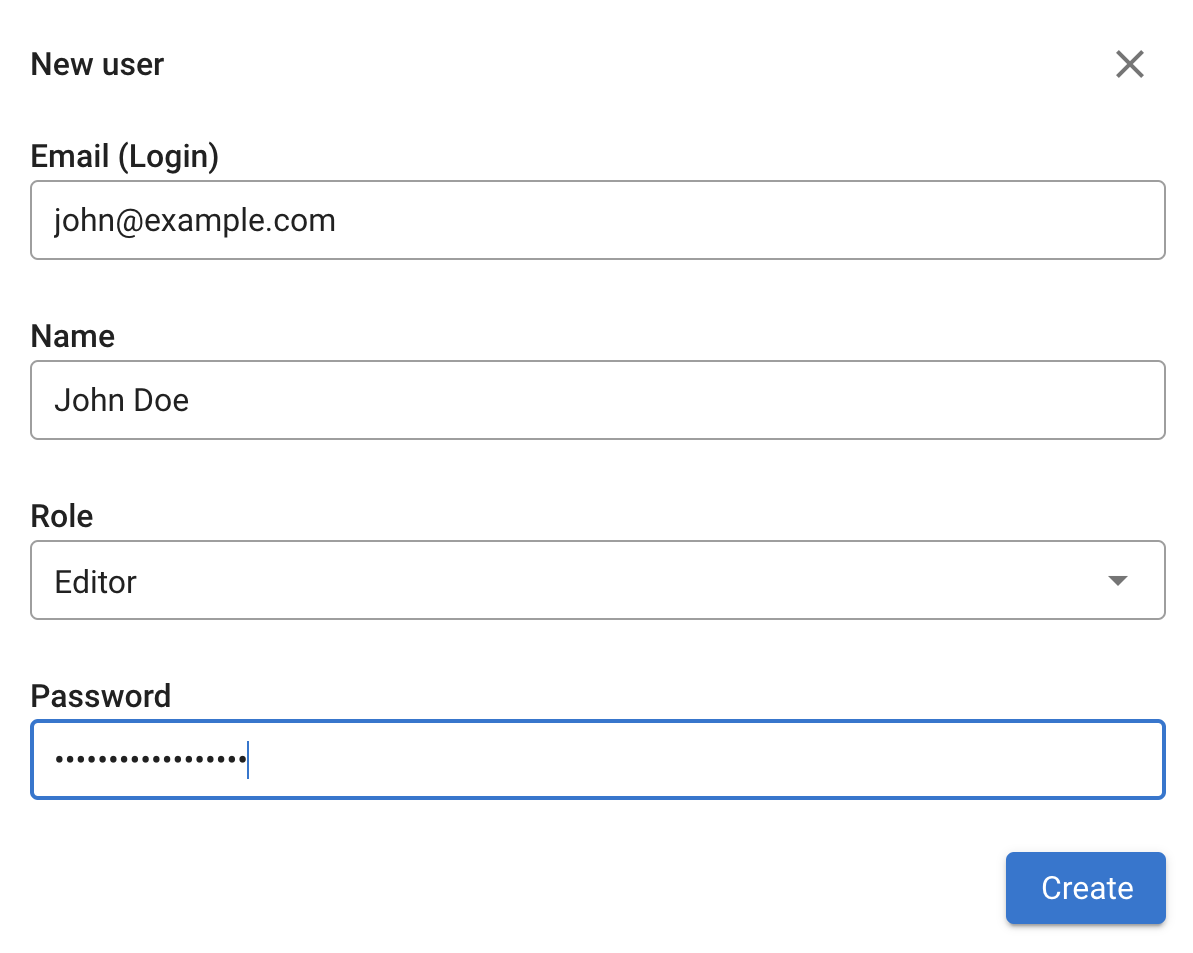
The Coroot Community Edition includes three predefined roles: Admin, Editor, and Viewer.
The Enterprise Edition allows you to create custom roles with granular permissions.
Single Sign-On (SSO)
Single Sign-On is available only in Coroot Enterprise (from $1 per CPU core/month). Start your free trial today.
Single Sign-On (SSO) feature streamlines user authentication by allowing team members to access the Coroot platform using a single set of credentials linked to an identity provider, such as Google Workspace, Okta, or other SSO solutions. With SSO, users no longer need to manage separate passwords for Coroot, enhancing both security and user experience.
Coroot supports two SSO protocols:
- SAML 2.0 - Coroot acts as the service provider (SP) and communicates with your identity provider (IdP) using SAML assertions.
- OIDC (OpenID Connect) - A protocol built on OAuth 2.0, commonly used by Google, Azure AD, Okta, and other providers.
Setup SAML with Okta
- Log in to the Okta portal.
- Go to the Admin Console in your Okta organization.
- Navigate to Applications > Applications.
- Click Create App Integration.
- Select SAML 2.0 as the Sign-in method.
- Click Next.
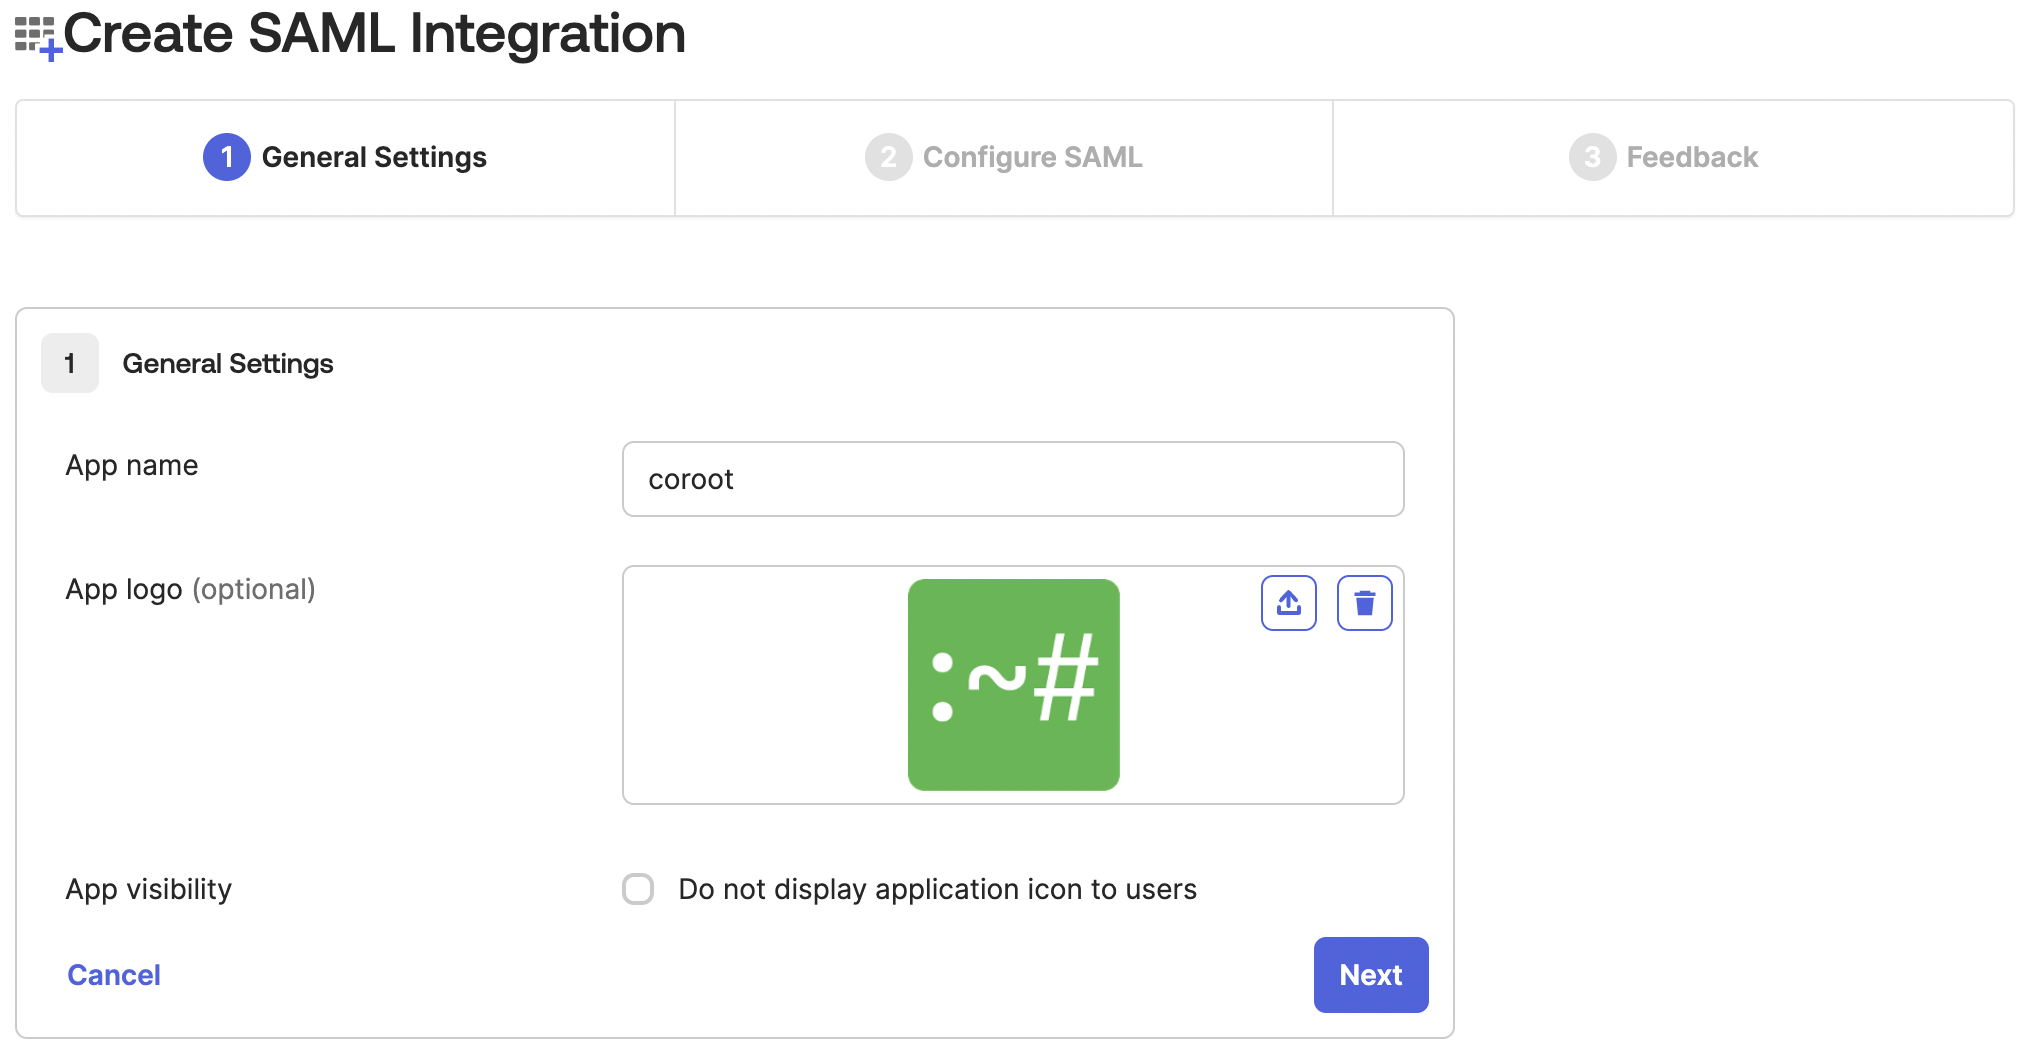
- On the General Settings tab, enter a name for your Coroot integration. You can also upload the logo.
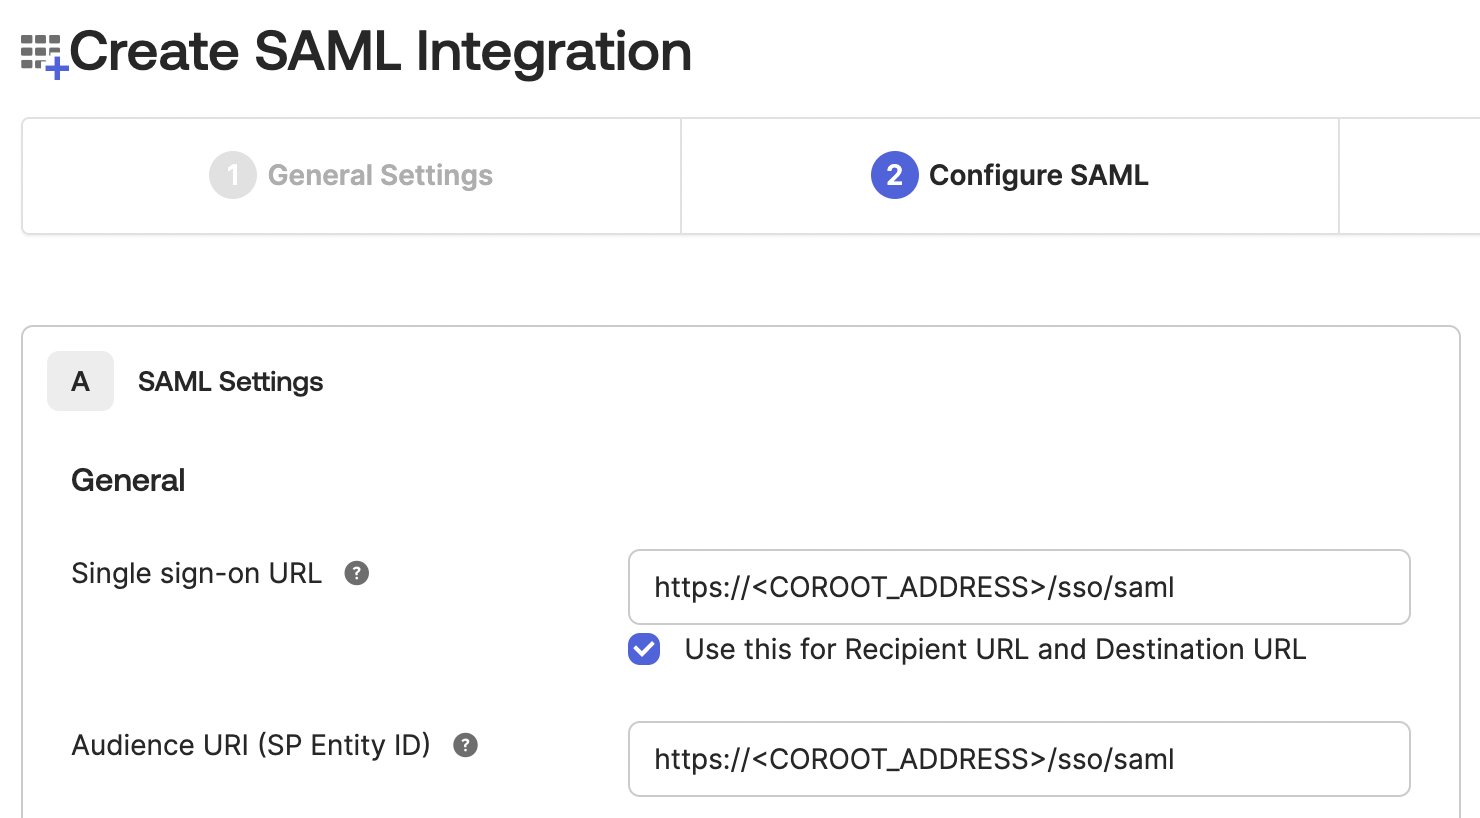
- On the Configure SAML tab:
- For both Single sign on URL and Audience URI (SP Entity ID) fields use the https://COROOT_ADDRESS/sso/saml URL.
- In the Attribute Statements section, configure
Email,FirstName, andLastNameattributes.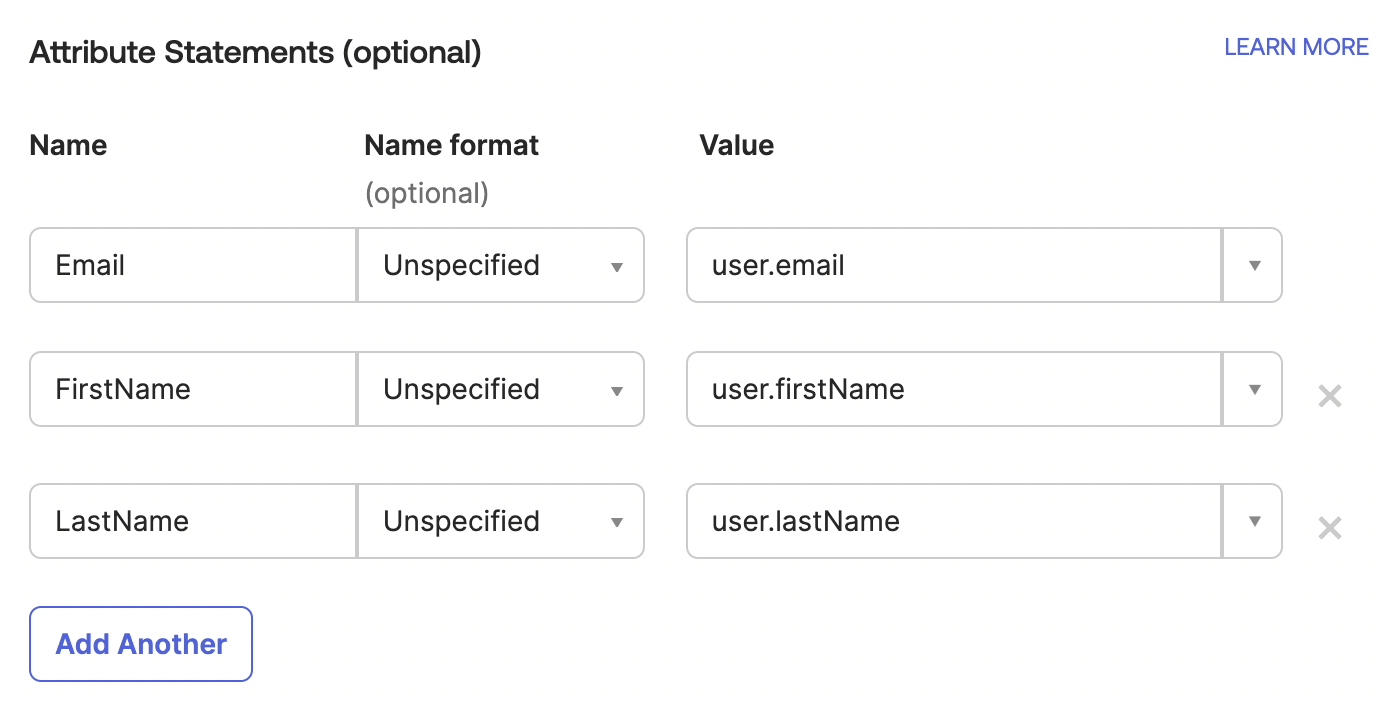
- For both Single sign on URL and Audience URI (SP Entity ID) fields use the https://COROOT_ADDRESS/sso/saml URL.
- Click Next.
- On the final Feedback tab, fill out the form and then click Finish.
- Download Identity Provider Metadata XML using the
Metadata URL: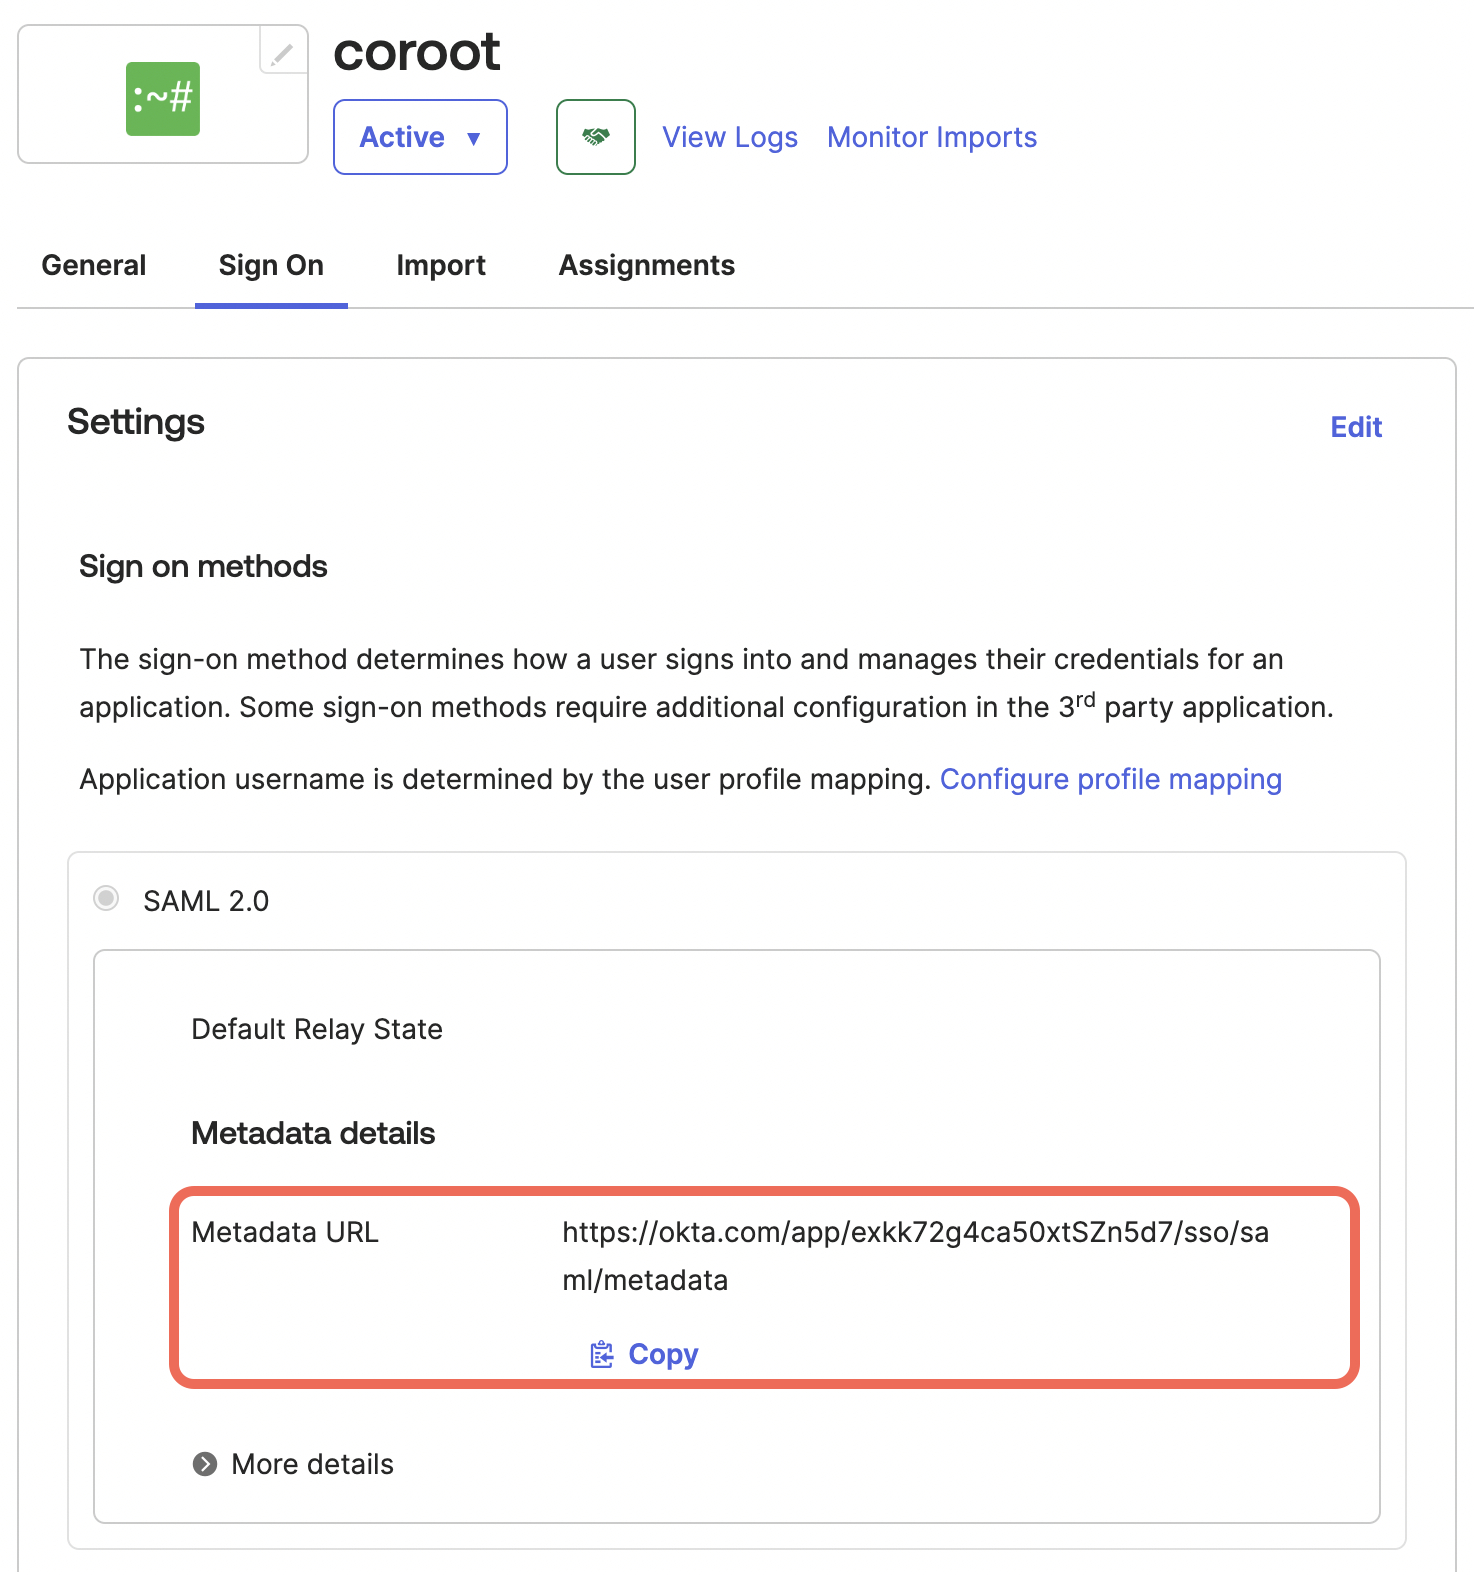
- Configure and enable SAML authentication for Coroot.
Setup SAML with Keycloak
- Log in to Keycloak as an administrator.
- Select Clients, then click Create client.
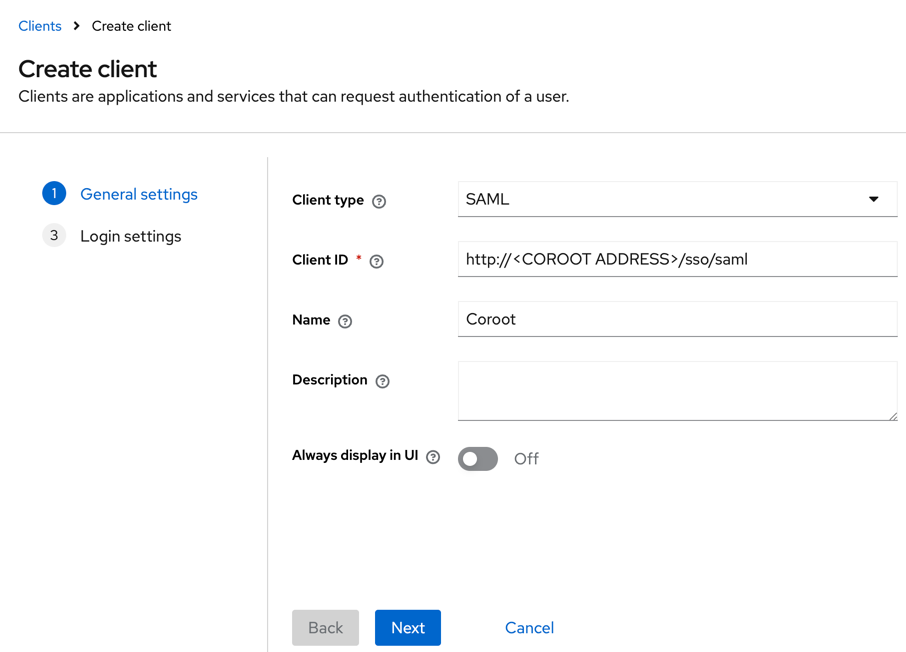
- Click Next and configure the Home URL and Valid redirect URIs fields.
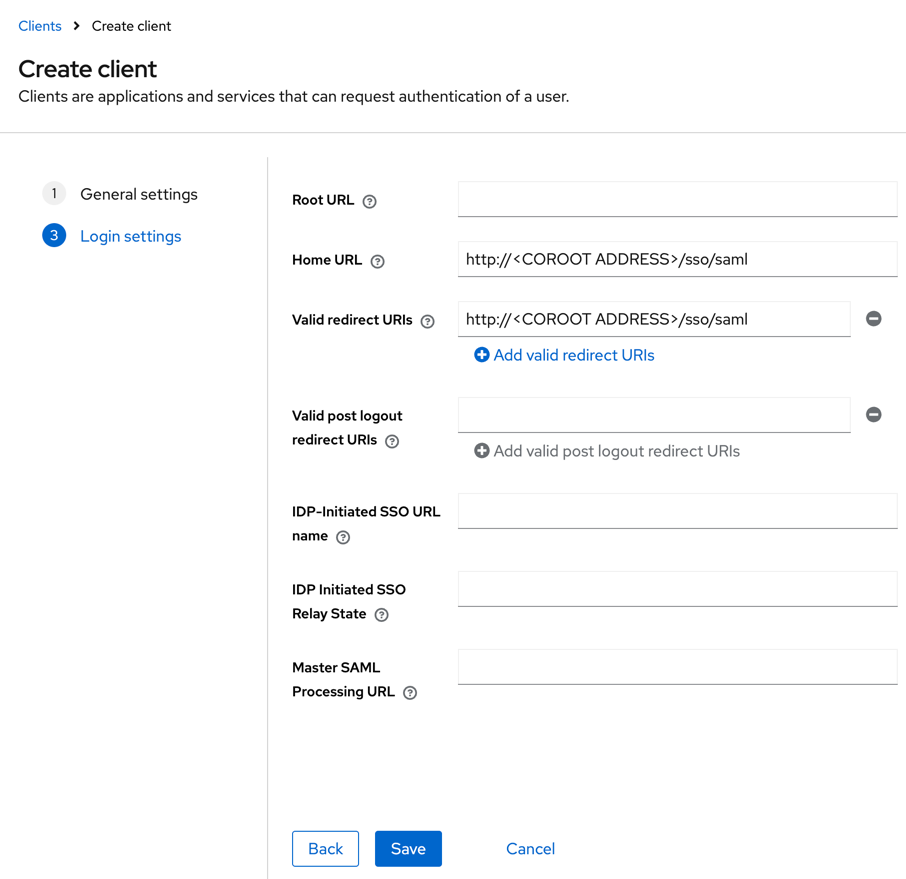
- Save the client.
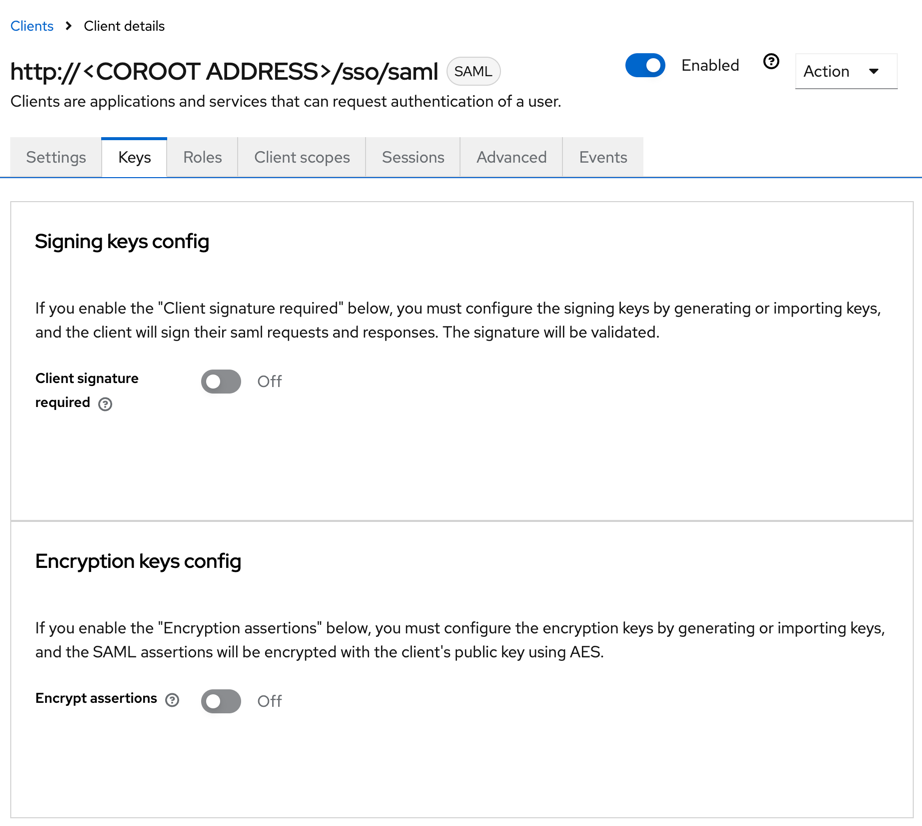
- Under the Keys tab, set Client signature required to Off.
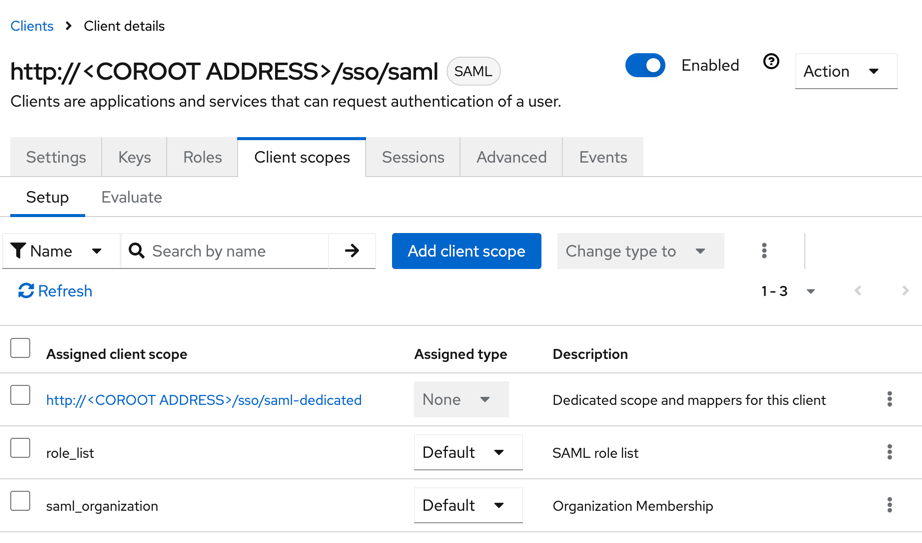
- Navigate to the Client scopes tab and click http://<COROOT ADDRESS>/sso/saml-dedicated.
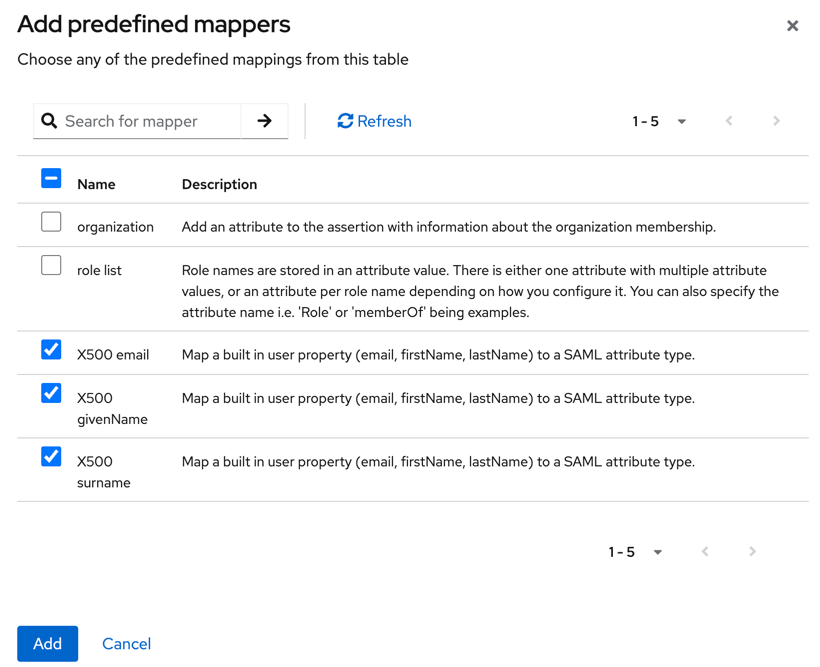
- Click Add predefined mapper, select the X500 email, X500 givenName, and X500 surname attributes, and click Add.
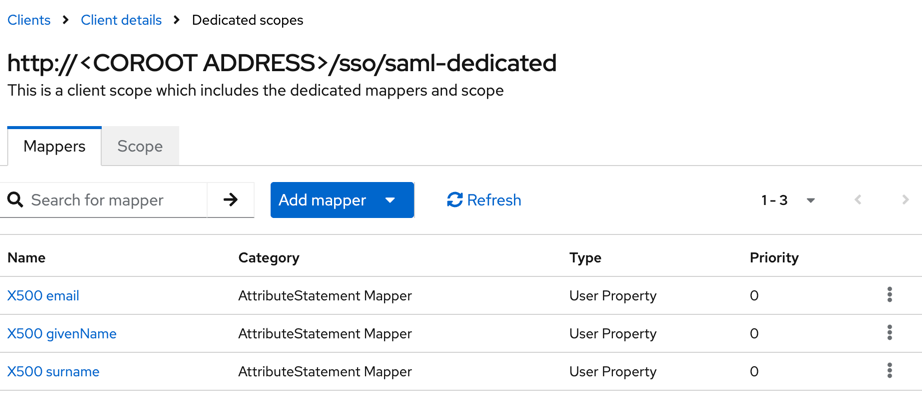
- Configure attributes mapping.
info
Coroot expects to receive the following attributes: Email, FirstName, and LastName
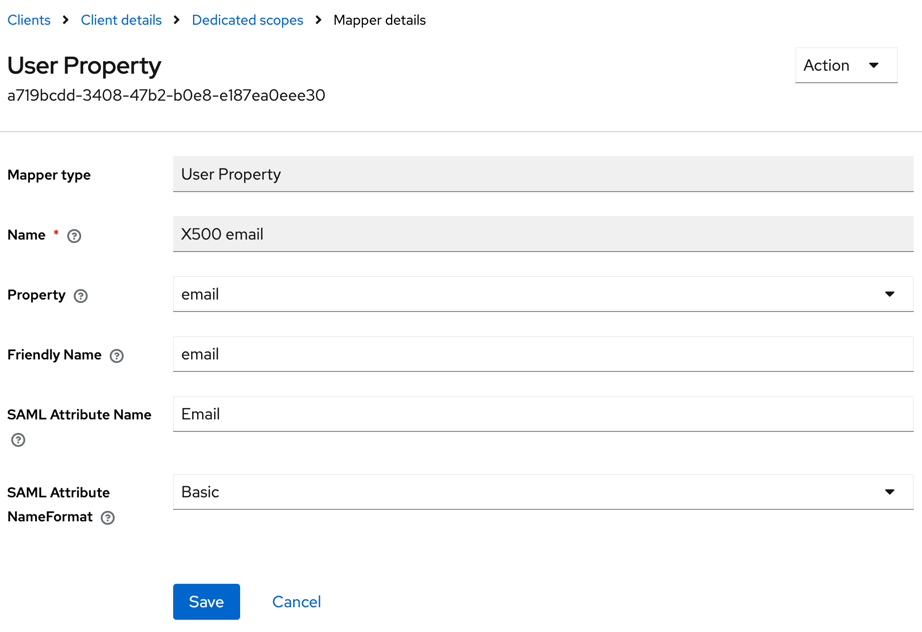
- Click X500 email and set SAML Attribute Name to Email, and SAML Attribute NameFormat to Basic.
- Click X500 givenName and set SAML Attribute Name to FirstName, and SAML Attribute NameFormat to Basic.

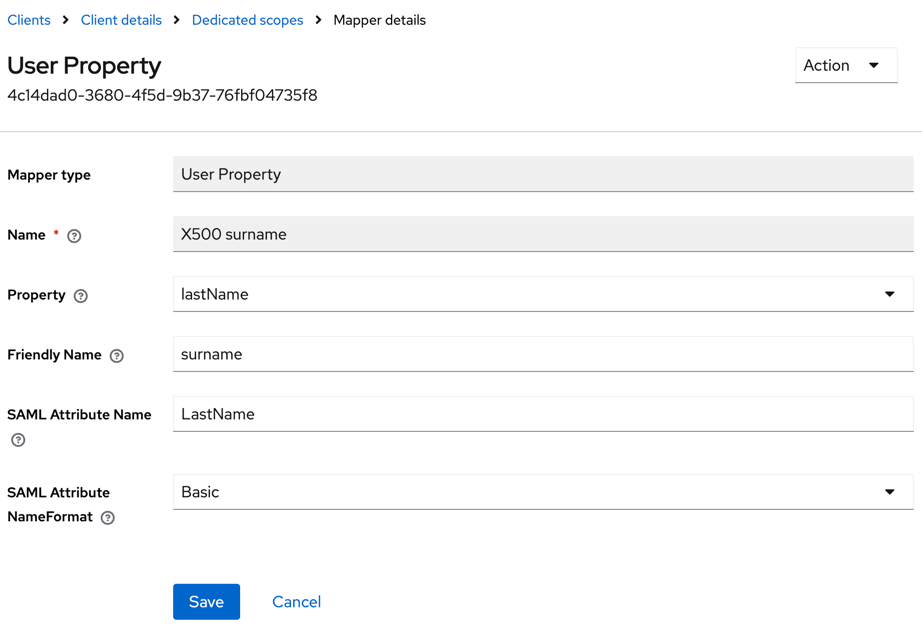
- Click X500 surname and set SAML Attribute Name to LastName, and SAML Attribute NameFormat to Basic.
- Click X500 email and set SAML Attribute Name to Email, and SAML Attribute NameFormat to Basic.
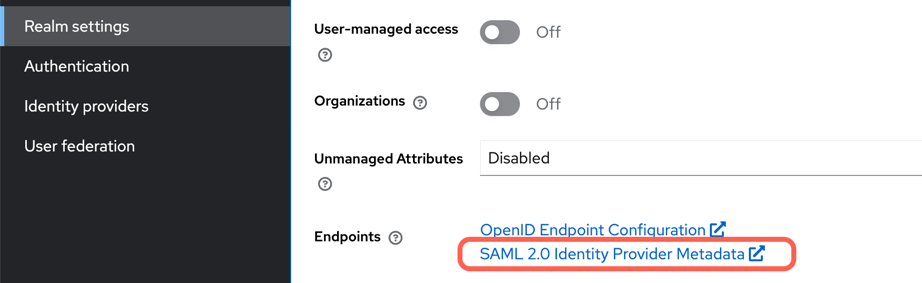
- Within you realm, select Realm settings and download SAML 2.0 Identity Provider Metadata
- Configure and enable SAML authentication for Coroot.
Setup SAML with OneLogin
-
Log in to the OneLogin Admin portal.
-
Navigate to Applications > Applications, then click Add App.
-
Search for SAML Custom Connector (Advanced) and select it.
-
Enter a name for your Coroot integration (you can also upload the logo), then click Save.
-
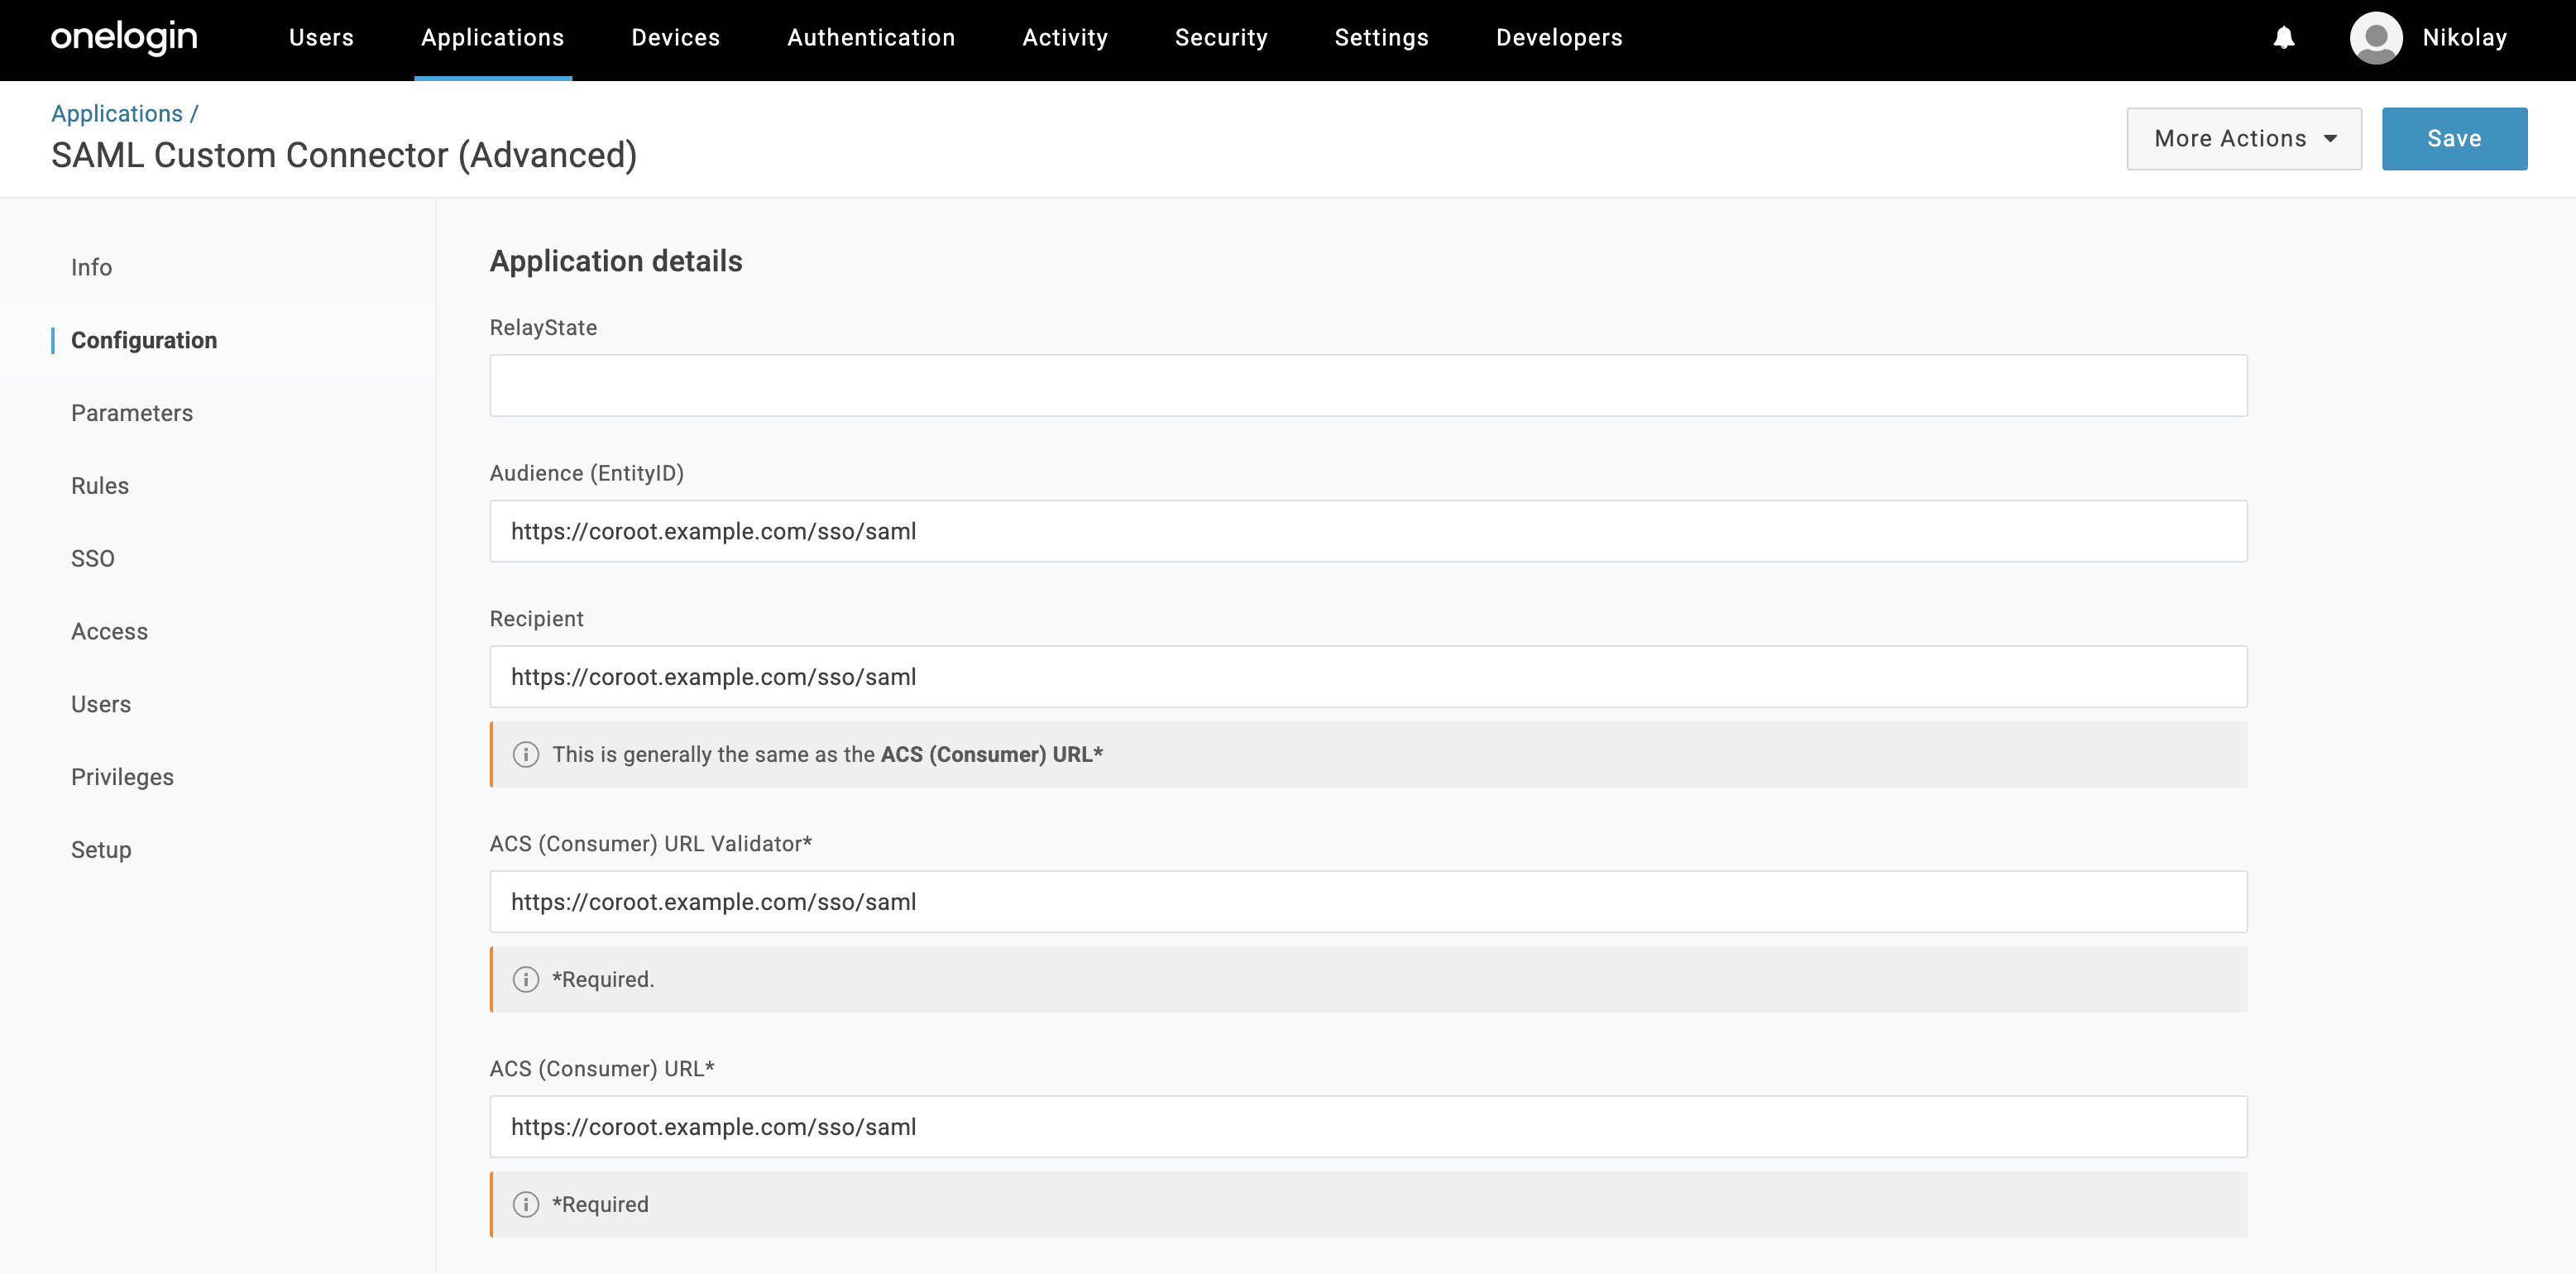
On the Configuration tab, set the following fields, all using the
https://COROOT_ADDRESS/sso/samlURL:- Audience (EntityID)
- Recipient
- ACS (Consumer) URL Validator
- ACS (Consumer) URL
Leave RelayState empty — Coroot manages it automatically.
-
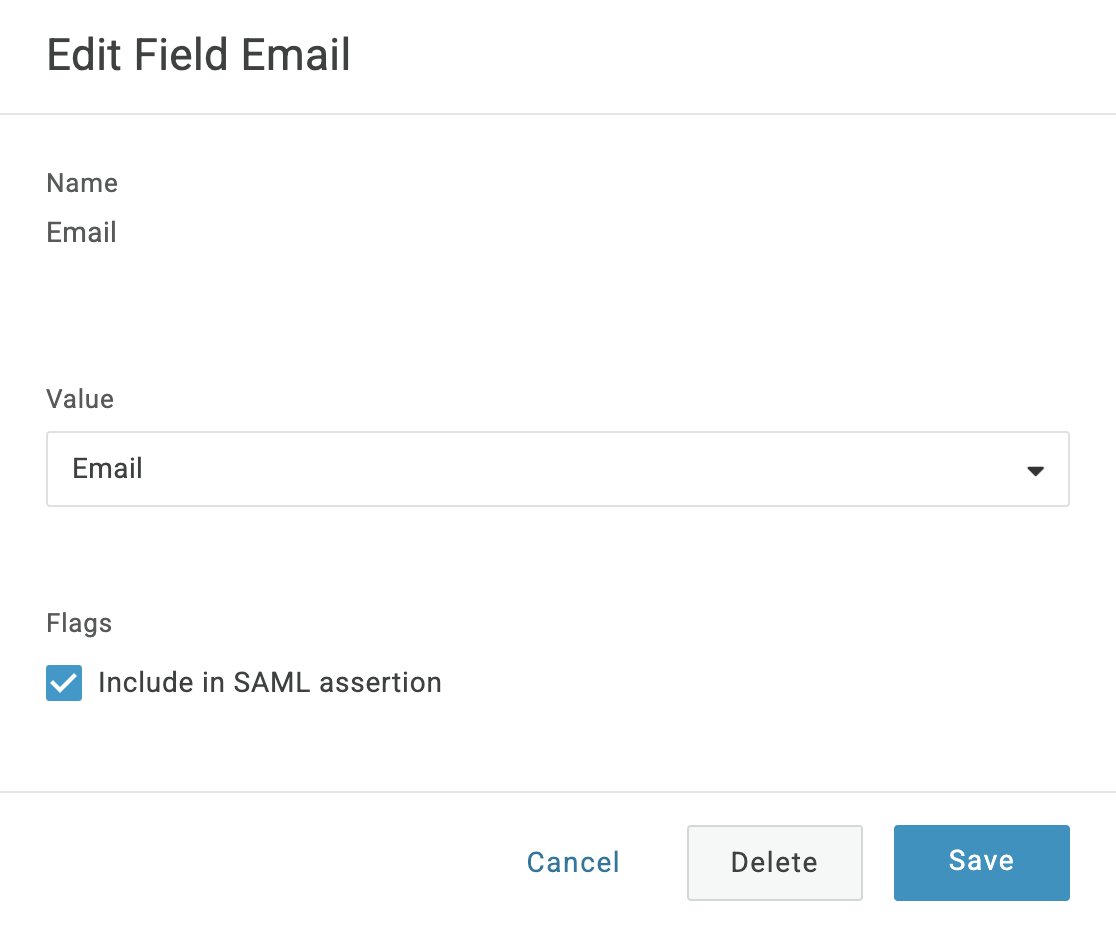
On the Parameters tab, configure the attribute mappings.
infoCoroot expects to receive the following attributes: Email, FirstName, and LastName
Add the
Email,FirstName, andLastNamefields, and set the NameID value to Email.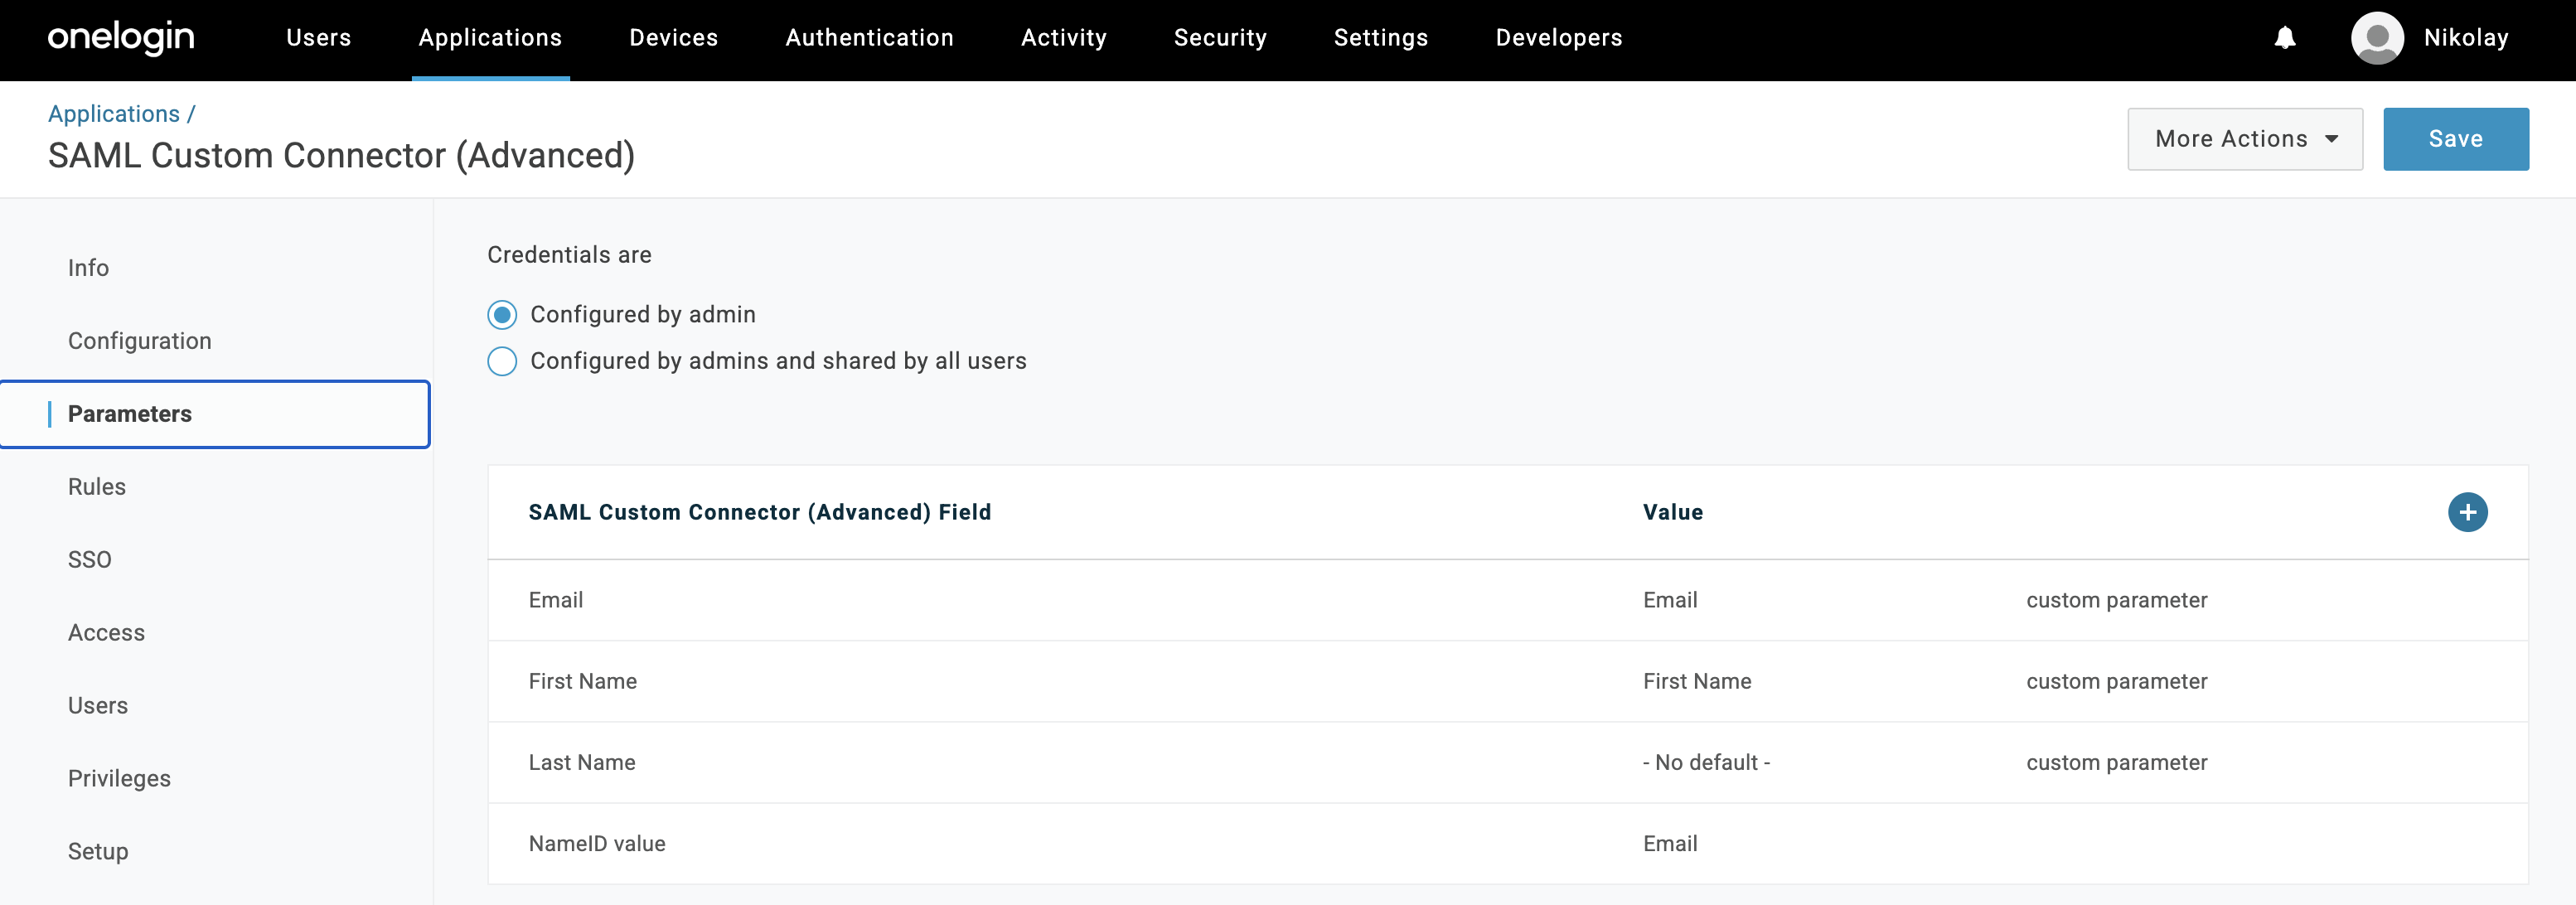
For each field, make sure the Include in SAML assertion flag is enabled, otherwise the attribute won't be sent to Coroot.
-
Click Save.
-
On the Access tab (or Users), assign the app to the users who should be able to log in to Coroot.
-
On the SSO tab, copy the Issuer URL / download the Identity Provider Metadata XML.
-
Configure and enable SAML authentication for Coroot.
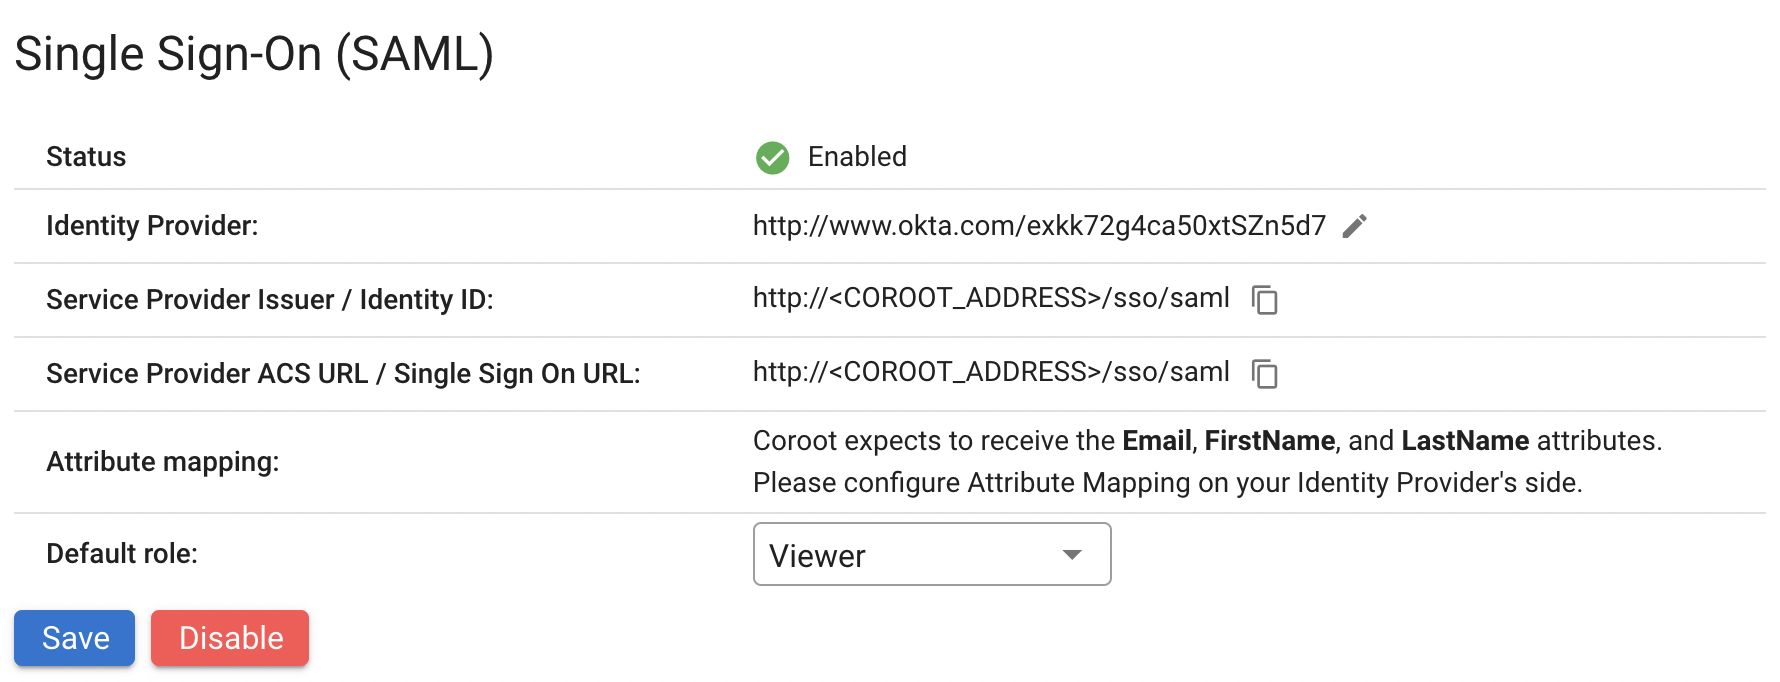
Configure SAML for Coroot
-
Navigate to the Project Settings > Organization > Single Sign-On (SAML) section.
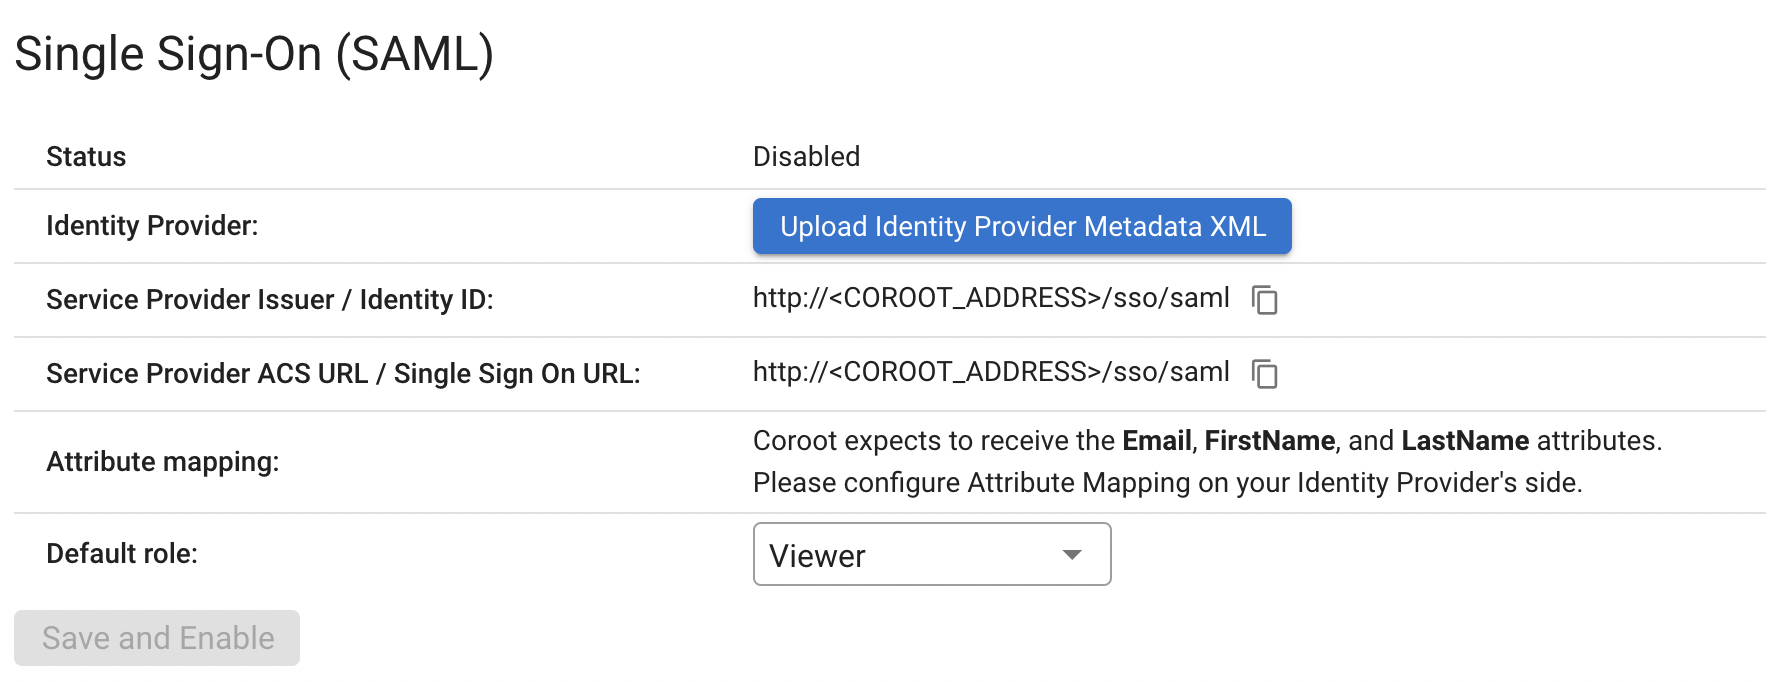
-
Use the Upload Identity Provider Metadata XML button to upload the IDP metadata file that was previously downloaded.
-
Click Save and Enable.
-
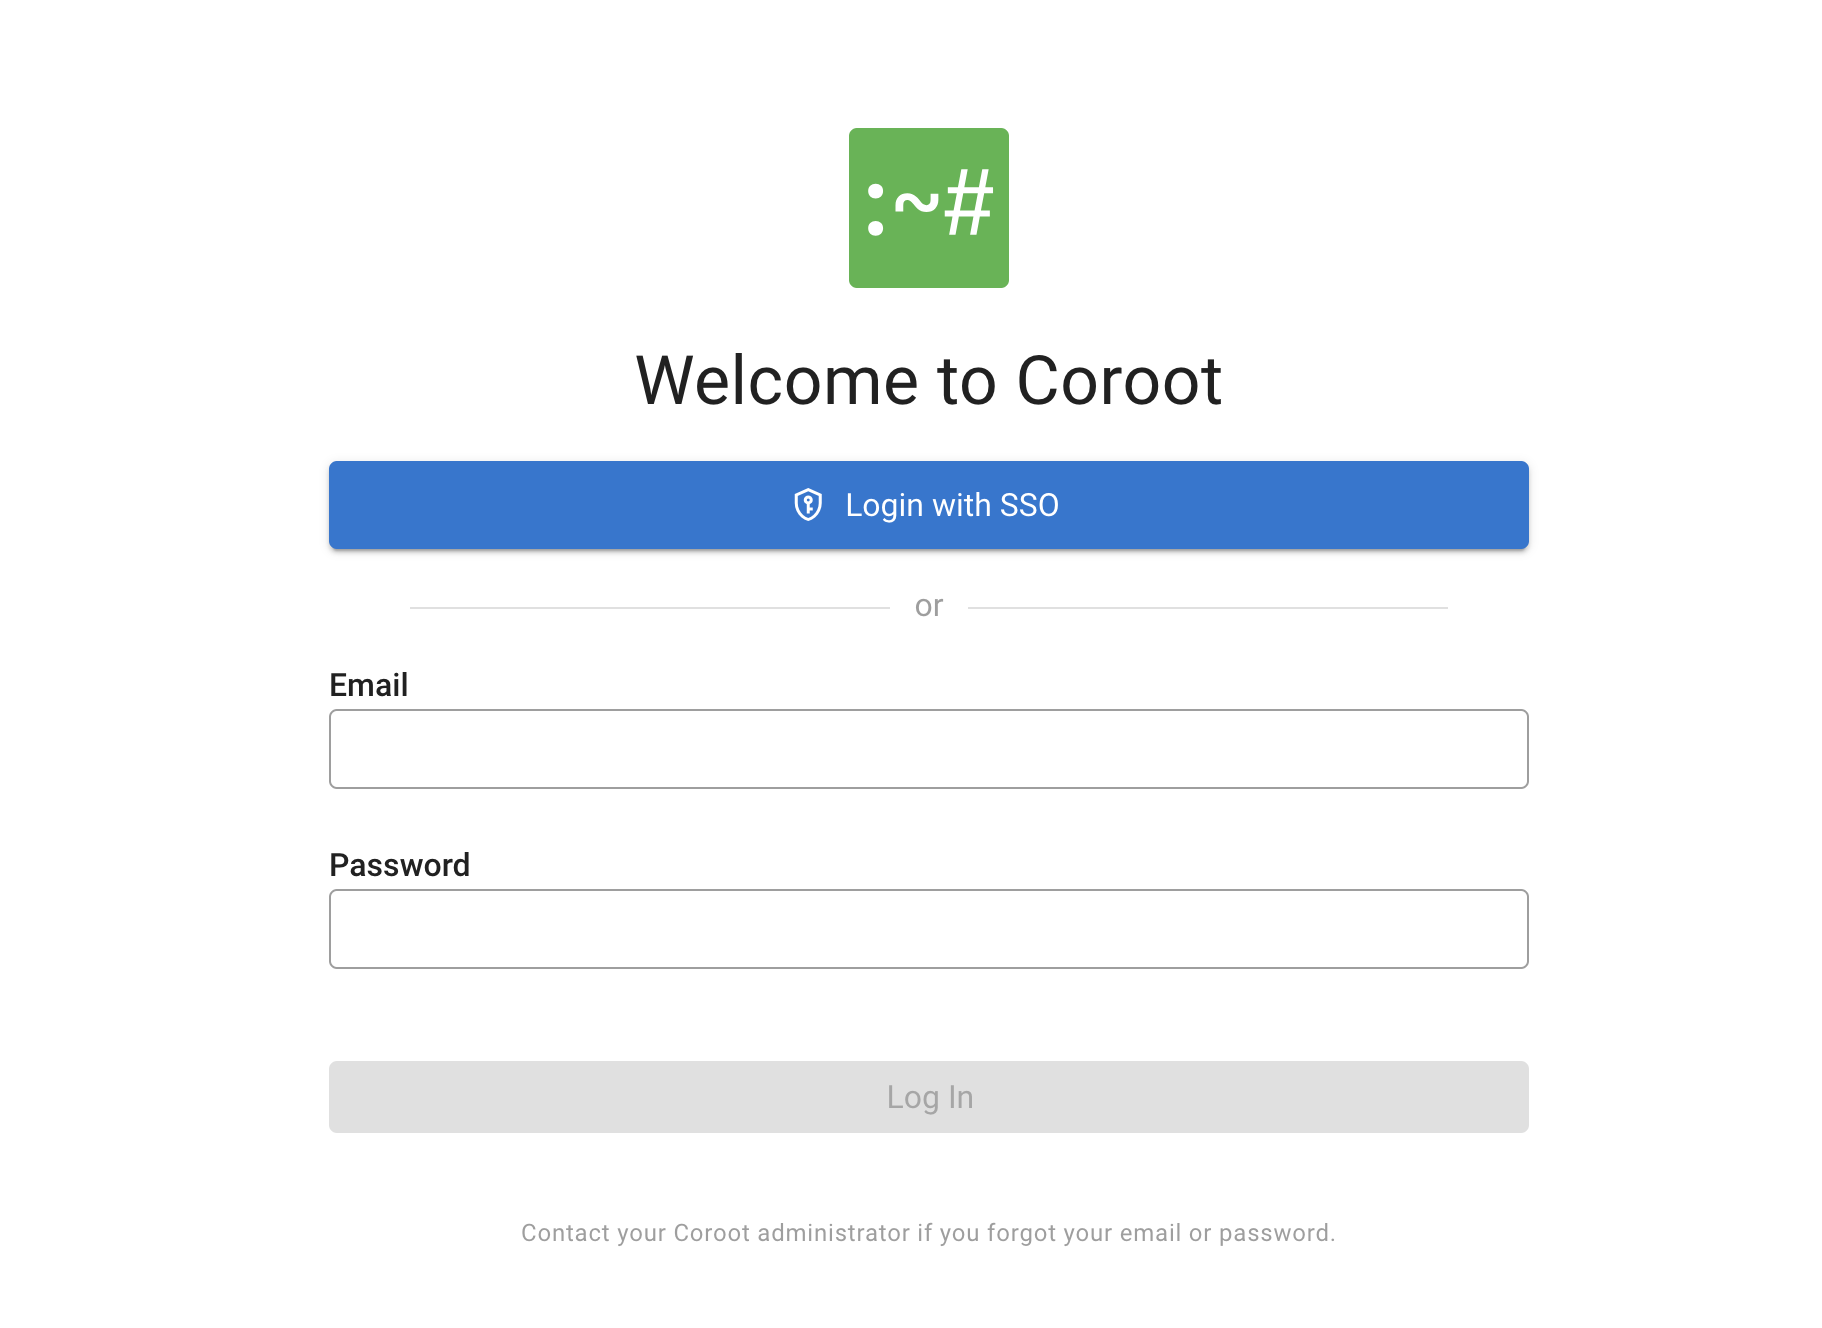
Once Single Sign-On is enabled, users can click the "Login with SSO" button on the login page to authenticate through the Identity Provider.
Each team member authenticated through the Identity Provider will be displayed in the Users list in Coroot, allowing you to manually change their roles.
Setup OIDC with Google Workspace
- Go to the Google Cloud Console.
- Select your project or create a new one.
- Navigate to APIs & Services > Credentials.
- Click Create Credentials > OAuth client ID.
- Select Web application as the application type.
- Enter a name for your OAuth client (e.g., "Coroot SSO").
- Under Authorized redirect URIs, add:
https://COROOT_ADDRESS/sso/oidc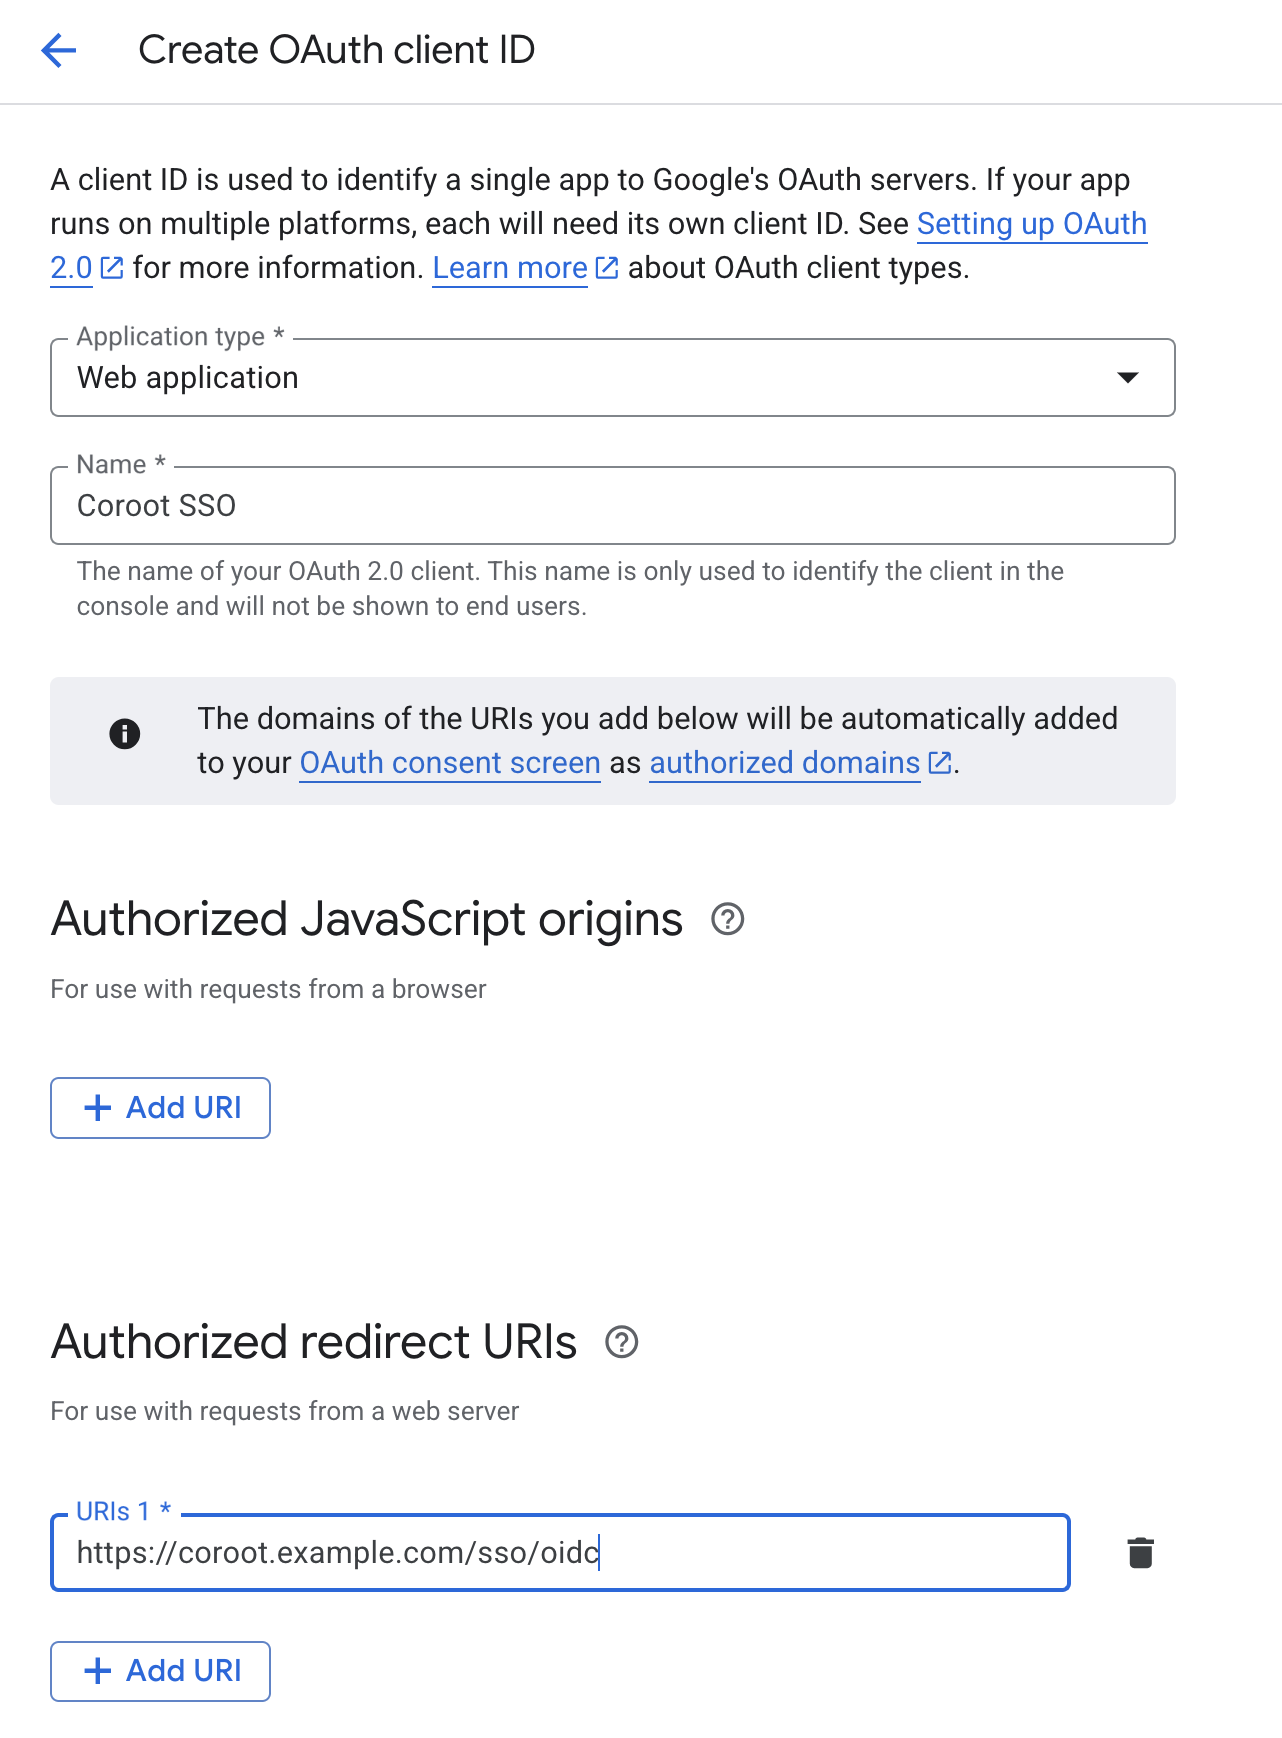
- Click Create.
- Copy the Client ID and Client Secret.
- Configure and enable OIDC authentication for Coroot using:
- Issuer URL:
https://accounts.google.com - Client ID and Client Secret from the previous step
- Issuer URL:
Setup OIDC with Azure AD (Entra ID)
- Log in to the Azure Portal.
- Navigate to Microsoft Entra ID (formerly Azure Active Directory).
- Go to App registrations > New registration.
- Enter a name for your application (e.g., "Coroot SSO").
- Under Redirect URI, select Web and enter:
https://COROOT_ADDRESS/sso/oidc - Click Register.
- On the application overview page, copy the Application (client) ID and Directory (tenant) ID.
- Navigate to Certificates & secrets > New client secret.
- Add a description and select an expiration period.
- Copy the Value of the new secret (this is your Client Secret).
- Configure and enable OIDC authentication for Coroot using:
- Issuer URL:
https://login.microsoftonline.com/{tenant-id}/v2.0(replace{tenant-id}with your Directory ID) - Client ID and Client Secret from the previous steps
- Issuer URL:
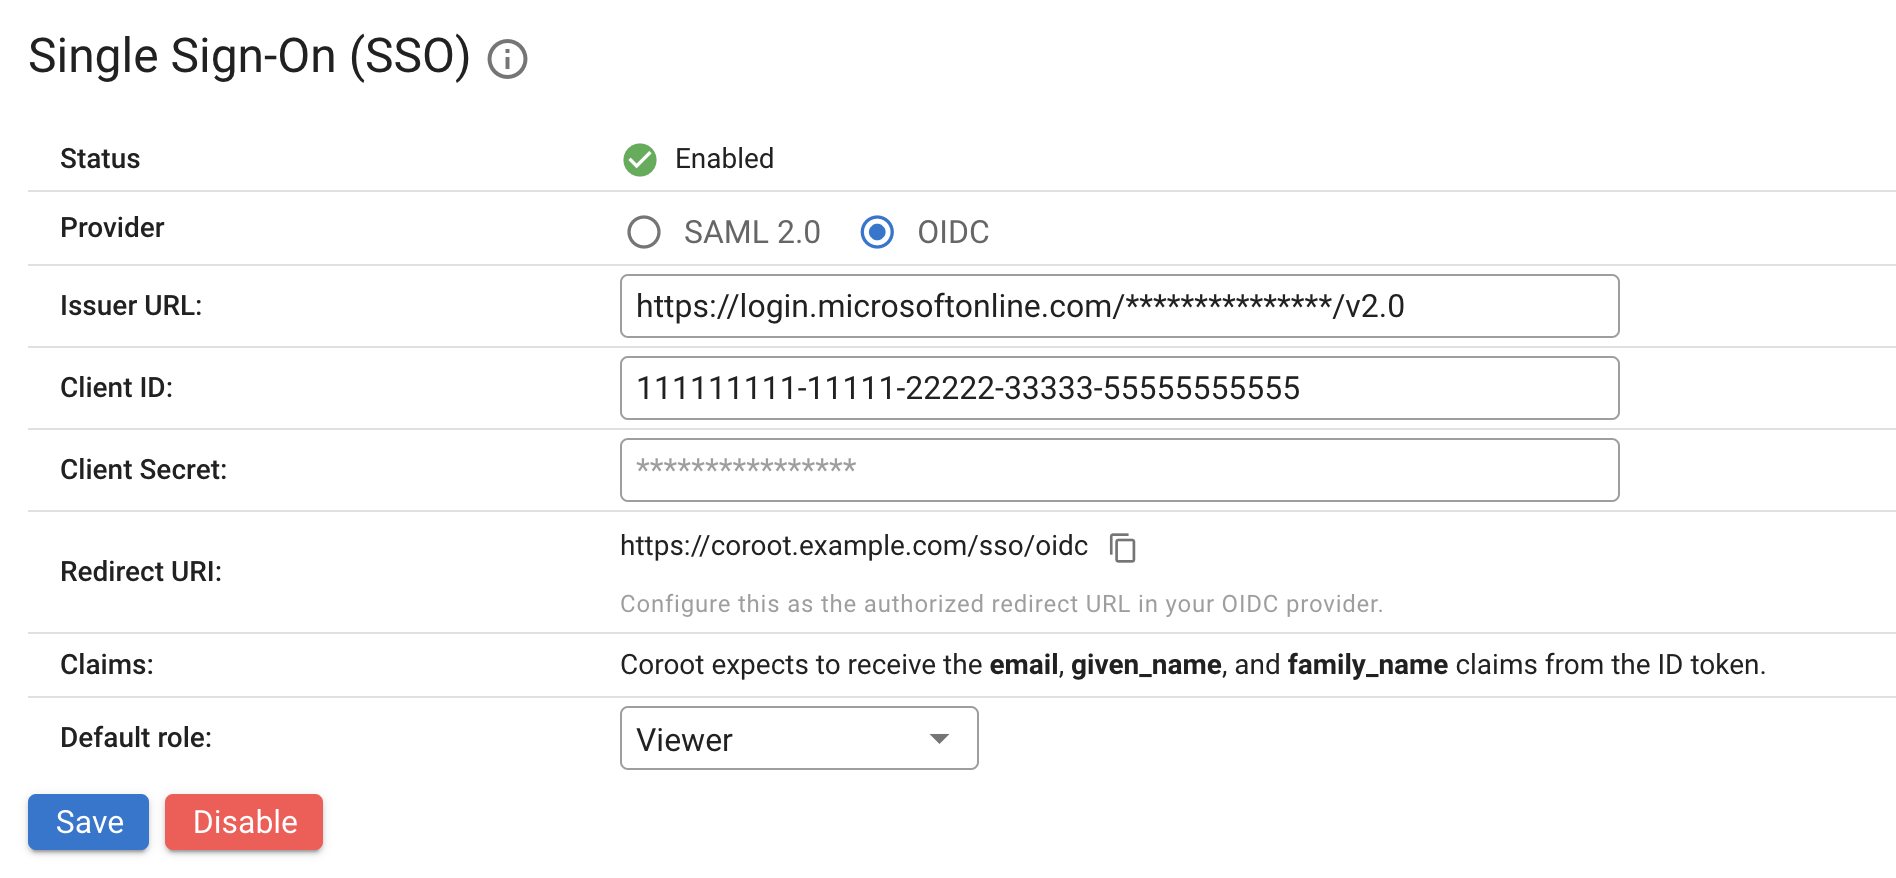
Configure OIDC for Coroot
-
Navigate to the Project Settings > Organization > Single Sign-On section.
-
Select OIDC as the provider.
-
Enter the following:
- Issuer URL: The URL of your identity provider (e.g.,
https://accounts.google.com) - Client ID: The client ID from your identity provider
- Client Secret: The client secret from your identity provider
- Default Role: The role assigned to new users authenticated through SSO
- Issuer URL: The URL of your identity provider (e.g.,
-
Copy the Redirect URI displayed and ensure it matches the redirect URI configured in your identity provider.
-
Click Save and Enable.
-
Once OIDC is enabled, users can click the "Login with SSO" button on the login page to authenticate.
Coroot expects to receive the email, given_name, and family_name claims from the ID token.
Most OIDC providers include these claims by default when the openid, profile, and email scopes are requested.
Force SSO
You can enforce SSO-only authentication by enabling the Force SSO option. When enabled:
- The login page will only show the "Login with SSO" button — the email/password form is hidden.
- Password-based login via the API is rejected.
- The initial admin password setup prompt is skipped.
This can be configured through the UI (on the SSO settings page) or via the config file:
sso:
  enabled: true
  forceSSO: true
  provider: oidc
  oidc:
    issuerURL: "https://accounts.google.com"
    clientID: "your-client-id"
    clientSecret: "your-client-secret"
  defaultRole: Viewer
Coroot will refuse to start if forceSSO is set to true but SSO is not properly configured.
Troubleshooting
Use http://<COROOT_ADDRESS>/login page and the admin user credentials to log in to your Coroot instance if you encounter any issues with SSO. If Force SSO is enabled, you must first disable it in the config file and restart Coroot to be able to log in with email and password.