Webhook
In addition to built-in notification integrations like Slack, Microsoft Teams, Pagerduty, and Opsgenie, Coroot can integrate with nearly any system using Webhooks.
To configure a Webhook integration:
- Go to the Project Settings → Integrations
- Create a Webhook integration
- Paste a Webhook URL to the form
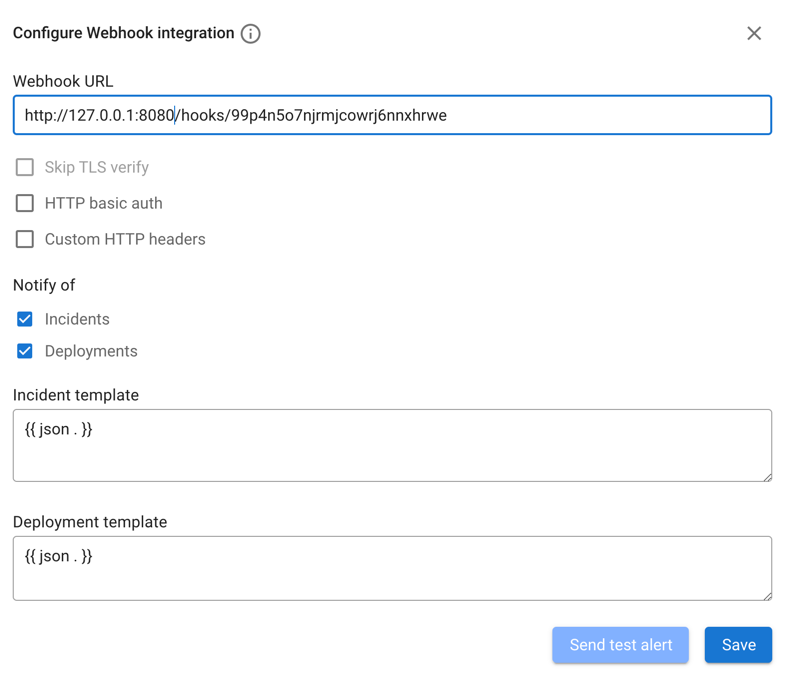
- Configure HTTP basic authentication and headers if required.
- Add custom fields if you need static key-value pairs included in every notification (see Custom fields below).
- Define templates for incidents, deployments, and alerts.
- Send a test alert to check the integration.
Template data
Notification templates are based on the Go templating system. Coroot applies provided templates to the following data structures:
type IncidentTemplateValues struct {
    Status string // OK, WARNING, CRITICAL
    Application struct {
        Namespace string
        Kind      string
        Name      string
    }
    Reports     []struct {
        Name    string // SLO, CPU, Memory, Net, ...
        Check   string // Availability, Latency, Memory leak, ...
        Message string // "error budget burn rate is 26x within 1 hour", "app containers have been restarted 11 times by the OOM killer", ...
    }
    URL             string // backlink to the incident page
    RCASummary      string // AI-generated short summary of the root cause (empty if RCA is not available)
    RCARemediations string // AI-generated remediation hints in Markdown (empty if RCA is not available)
}
type DeploymentTemplateValues struct {
    Status string // Deployed, Cancelled, Stuck
    Application struct {
        Namespace string
        Kind      string
        Name      string
    }
    Version string   // deployed application version
    Summary []string // "Availability: 87% (objective: 99%)", "CPU usage: +21% (+$37/mo)", "Memory: a memory leak detected", ...
    URL string       // backlink to the deployment page
}
type AlertTemplateValues struct {
    Status string // OK, WARNING, CRITICAL
    ProjectName string // project name, e.g. "production"
    Application struct {
        Namespace string
        Kind      string
        Name      string
    }
    RuleName    string // alerting rule name, e.g. "Low disk space"
    Severity    string // warning, critical
    Summary     string // human-readable description, e.g. "disk space is low on /dev/sda1 (12% free)"
    Details     []struct {
        Name  string // detail label, e.g. "Log pattern"
        Value string // detail value
    }
    Duration    string // how long the alert was active, e.g. "5m30s", "1h30m" (only set for resolved alerts)
    ResolvedBy  string // who resolved the alert (only set for manually resolved or suppressed alerts)
    URL         string // backlink to the alert page
}
Custom fields
Custom fields are static key-value pairs that you can configure in the webhook integration settings.
Once defined, they are merged into the root of every notification's template data (incidents, deployments, and alerts)
and are accessible both in templates and in {{ json . }} output.
For example, if you add a custom field environment = production, you can reference it in templates as {{ .Environment }}.
When using {{ json . }}, it will appear as a top-level key in the resulting JSON.
If a custom field has the same name as a built-in field (e.g. status), the built-in field takes precedence.
Custom field names are capitalized in templates (e.g., a field named environment is accessed as {{ .Environment }}), consistent with built-in fields like {{ .Status }} and {{ .Application.Name }}.
Examples
- Plain Text
- JSON
- Telegram
- Mattermost
- Discord
If you want to customize the message format, you can utilize Go templating syntax to modify alert or deployment notifications based on the provided data structure. Below are sample templates you can use as examples.
Incident template:
{{- if eq .Status `OK` }}
{{ .Application.Name }}@{{ .Application.Namespace }} incident resolved
{{- else }}
{{ .Status }} {{ .Application.Name }}@{{ .Application.Namespace }} is not meeting its SLOs
{{- end }}
{{- range .Reports }}
• *{{ .Name }}* / {{ .Check }}: {{ .Message }}
{{- end }}
{{ .URL }}
Deployment template:
Deployment of {{ .Application.Name }}@{{ .Application.Namespace }}
*Status*: {{ .Status }}
*Version*: {{ .Version }}
{{- if .Summary }}
*Summary*:
{{- range .Summary }}
• {{ . }}
{{- end }}
{{- end }}
{{ .URL }}
Alert template:
{{- if eq .Status `OK` }}
[RESOLVED] {{ .RuleName }}: {{ .Application.Name }}@{{ .Application.Namespace }}
{{- else }}
[{{ .Status }}] {{ .RuleName }}: {{ .Application.Name }}@{{ .Application.Namespace }}
{{- end }}
{{ .Summary }}
{{- range .Details }}
• {{ .Name }}: {{ .Value }}
{{- end }}
{{ .URL }}
If the system you aim to integrate accepts JSON-formatted messages, you can employ the built-in json template function:
{{ json . }}
This template will encode the incident, deployment, and alert data structures into valid JSON messages with the specified schema.
A sample of resulting incident message (assuming custom fields environment = production and team = platform are configured):
{
  "environment": "production",
  "team": "platform",
  "status": "WARNING",
  "application": "default:Deployment:app1",
  "reports": [
    {
      "name": "SLO",
      "check": "Latency",
      "message": "error budget burn rate is 20x within 1 hour"
    },
    {
      "name": "Net",
      "check": "Network round-trip time (RTT)",
      "message": "high network latency to 2 upstream services"
    }
  ],
  "url": "http://127.0.0.1:8080/p/x0xwl4jz/app/default:Deployment:app1?incident=123ab456",
  "rca_summary": "Dropped index on postgres-products caused CPU saturation on node2, degrading product-catalog latency",
  "rca_remediations": "Recreate the dropped trigram index on the products table in postgres-products:\n```sql\nCREATE INDEX idx_products_name_trgm ON public.products USING gin (name gin_trgm_ops);\n```\nIf the pg_trgm extension is not already enabled:\n```sql\nCREATE EXTENSION IF NOT EXISTS pg_trgm;\n```\nThen revert the ArgoCD commit (52ebd518) that removed the index to prevent it from being dropped again on the next sync."
}
The rca_summary and rca_remediations fields are only present when AI Root Cause Analysis is available (Coroot Enterprise or Coroot Cloud integration).
A sample of resulting deployment message:
{
  "environment": "production",
  "team": "platform",
  "status": "Deployed",
  "application": "default:Deployment:app1",
  "version": "123ab456: app:v1.8.2",
  "summary": [
    "💔 Availability: 87% (objective: 99%)",
    "💔 CPU usage: +21% (+$37/mo) compared to the previous deployment",
    "🎉 Memory: looks like the memory leak has been fixed"
  ],
  "url": "http://127.0.0.1:8080/p/x0xwl4jz/app/default:Deployment:app1/Deployments#123ab456:123"
}
A sample of resulting alert message:
{
  "environment": "production",
  "team": "platform",
  "status": "WARNING",
  "project_name": "production",
  "application": "default:Deployment:app1",
  "rule_name": "Low disk space",
  "severity": "warning",
  "summary": "disk space is low on /dev/sda1 (12% free)",
  "details": [
    {
      "name": "Log pattern",
      "value": "ERROR: disk space is running low"
    }
  ],
  "url": "http://127.0.0.1:8080/p/x0xwl4jz/alerts?alert=abc123"
}
Telegram's sendMessage API call expects JSON with two required fields: chat_id and text.
Follow the steps below to create a Telegram Bot and obtain chat_id:
- Create a Telegram Bot:
- Open Telegram and search for the
BotFatheruser. - Start a chat with BotFather and type
/newbot. - Follow the instructions to set up your new bot. You'll need to provide a name and a username for your bot.
- Once the bot is created, BotFather will provide you with a token. Keep this token safe as you'll need it later.
- Open Telegram and search for the
- Add Your Bot to a Chat:
- After creating your bot, you'll want to add it to a chat. You can add it to an existing group or create a new one.
- In Telegram, search for the chat where you want to add the bot.
- Click on the chat name to open the chat settings.
- Select "Add members" or "Invite to group" depending on your platform.
- Search for your bot's username and add it to the chat.
- Obtain Chat ID:
- Once your bot is added to the chat, you need to obtain the chat ID.
- Send a message to the chat where your bot is added.
- Now, you need to fetch the chat ID. You can do this using various methods:
- Use a Telegram bot like
@userinfobotor@getidsbot. Send the command/getidin the chat and it will reply with the chat ID.
Now build the link for webhook. It will look like https://api.telegram.org/bot[botID]:[botToken]/sendMessage and paste it into the Webhook URL
Then proceed with filling templates.
Sample incident template:
{
  "chat_id": "-123456789",
  "text": "
{{- if eq .Status `OK` }}
[{{ .Application.Name }}@{{ .Application.Namespace }}]({{ .URL }}) incident resolved
{{- else }}
{{ .Status }} [{{ .Application.Name }}@{{ .Application.Namespace }}]({{ .URL }}) is not meeting its SLOs
{{- end }}
{{- range .Reports }}
• *{{ .Name }}* / {{ .Check }}: {{ .Message }}
{{- end }}",
  "parse_mode": "Markdown"
}
Sample deployment template:
{
  "chat_id": "-123456789",
  "text": "
Deployment of [{{ .Application.Name }}@{{ .Application.Namespace }}]({{ .URL }})
*Status*: {{ .Status }}
*Version*: {{ .Version }}
{{- if .Summary }}
*Summary*:
{{- range .Summary }}
• {{ . }}
{{- end }}
{{- end }}",
  "parse_mode": "Markdown"
}
Sample alert template:
{
  "chat_id": "-123456789",
  "text": "
{{- if eq .Status `OK` }}
[RESOLVED] *{{ .RuleName }}*: {{ .Application.Name }}@{{ .Application.Namespace }}
{{- else }}
[{{ .Status }}] *{{ .RuleName }}*: {{ .Application.Name }}@{{ .Application.Namespace }}
{{- end }}
{{ .Summary }}
{{- range .Details }}
• {{ .Name }}: {{ .Value }}
{{- end }}
{{ .URL }}",
  "parse_mode": "Markdown"
}
Mattermost's Incoming Webhook requires JSON with the text or attachments fields specified.
Refer to the Mattermost documentation to create an incoming webhook and obtain its URL.
Sample incident template:
{
  "text": "
{{- if eq .Status `OK` }}
#### [{{ .Application.Name }}@{{ .Application.Namespace }}]({{ .URL }}) incident resolved
{{- else }}
#### {{ .Status }} [{{ .Application.Name }}@{{ .Application.Namespace }}]({{ .URL }}) is not meeting its SLOs
{{- end }}
{{- range .Reports }}
• **{{ .Name }}** / {{ .Check }}: {{ .Message }}
{{- end }}"
}
Sample deployment template:
{
  "text": "
#### Deployment of [{{ .Application.Name }}@{{ .Application.Namespace }}]({{ .URL }})
**Status**: {{ .Status }}
**Version**: {{ .Version }}
{{- if .Summary }}
**Summary**:
{{- range .Summary }}
• {{ . }}
{{- end }}
{{- end }}"
}
Sample alert template:
{
  "text": "
{{- if eq .Status `OK` }}
#### [RESOLVED] **{{ .RuleName }}**: {{ .Application.Name }}@{{ .Application.Namespace }}
{{- else }}
#### [{{ .Status }}] **{{ .RuleName }}**: {{ .Application.Name }}@{{ .Application.Namespace }}
{{- end }}
{{ .Summary }}
{{- range .Details }}
• {{ .Name }}: {{ .Value }}
{{- end }}
{{ .URL }}"
}
Discord's Webhook requires JSON with the content field specified (doc). Refer to the Discord documentation to create a webhook and obtain its URL.
Sample incident template:
{
  "content": "
{{- if eq .Status `OK` }}
### [{{ .Application.Name }}@{{ .Application.Namespace }}]({{ .URL }}) incident resolved
{{- else }}
### {{ .Status }} [{{ .Application.Name }}@{{ .Application.Namespace }}]({{ .URL }}) is not meeting its SLOs
{{- end }}
{{- range .Reports }}
• **{{ .Name }}** / {{ .Check }}: {{ .Message }}
{{- end }}"
}
Sample deployment template:
{
  "content": "
### Deployment of [{{ .Application.Name }}@{{ .Application.Namespace }}]({{ .URL }})
**Status**: {{ .Status }}
**Version**: {{ .Version }}
{{- if .Summary }}
**Summary**:
{{- range .Summary }}
• {{ . }}
{{- end }}
{{- end }}"
}
Sample alert template:
{
  "content": "
{{- if eq .Status `OK` }}
### [RESOLVED] **{{ .RuleName }}**: {{ .Application.Name }}@{{ .Application.Namespace }}
{{- else }}
### [{{ .Status }}] **{{ .RuleName }}**: {{ .Application.Name }}@{{ .Application.Namespace }}
{{- end }}
{{ .Summary }}
{{- range .Details }}
• {{ .Name }}: {{ .Value }}
{{- end }}
{{ .URL }}"
}